
Openings
With the Openings plug-in you define where walls, slabs, floors and foundations must be opened for building services: wall and slab openings, chases, furring walls, sleeves and core holes. Every opening is a box or a cylinder with dimensions, type, disciplines and a sequence number. In the plan it appears as a 2D symbol (outline with hatch and symbol), in the model as a 3D solid – or as both, firmly linked. The clash check of the piping and duct plug-ins knows the 3D openings, and they go into the IFC export.
How this help is organized
From overview to detail – read only as far as you need right now:
| Part | What you will find | For whom |
|---|---|---|
| Quick start | Insert a wall opening in a few steps and change it afterwards – one picture per step. | Anyone placing their first opening today |
| Concepts | Box and cylinder, the types, 2D, 3D and the fixed pair, clearance, base point, template, display by type, sequence number. | Anyone who wants to understand how the plug-in works |
| Tasks | Every function of the palette and of the action bar in detail: goal, steps, keys, options, example, notes – with a short video at the end. | Anyone who needs a particular function |
| Reference | All buttons, all keys, the gear menu, the dialog boxes, every setting in detail and the typical messages. | Anyone looking for something specific |
The tasks are ordered by work step: Inserting openings, Editing openings, Templates and display and Number, annotation and lists.
Overview
An opening comes into being step by step:
- In the palette choose a template – it brings type, dimensions, clearance, disciplines and the look in the plan. Create your own templates in the gear menu › Manage templates ….
- Under Display choose what is created: 2D (plan symbol), 3D (solid) or 2D and 3D (both, linked).
- Click Insert. The Dimensions dialog box shows the values of the template; change the dimensions or pick them in the drawing with the crosshair button. OK.
- The opening hangs at the cursor. With the Space choose the point it hangs by, with A a distance, with R the direction. A click inserts it – it gets the next free number.
- Change it with Change properties, grips, MOVE, ROTATE or COPY of GstarCAD; a 2D/3D pair always changes together.
- Output annotation, legend and opening schedule – at the bottom of the palette.
| Page | What you will find |
|---|---|
| Inserting openings | Choosing a template, 2D/3D display, insert, the Dimensions dialog box, picking dimensions, base point, distance, rotating, elevation of the 3D, property fields of the next opening |
| Editing openings | Change properties, fixed point, delete, convert 2D to 3D, the fixed pair, grips and CAD commands, Properties palette |
| Templates and display | Managing and editing templates, display by type, hatch in the plan, layers |
| Number, annotation and lists | Sequence number, renumber, annotate, legend, opening schedule, list options, update legend, IFC and clash check |
The pages of the palette
You open the palette on the ribbon › LuaCAD tab › Openings; how a palette is built is explained in Getting started. The palette has one page. At the top of the title bar there is an "i" with a short explanation; "More in the online help" leads here. You will find every button in the Reference, every setting under Every setting in detail.
Openings
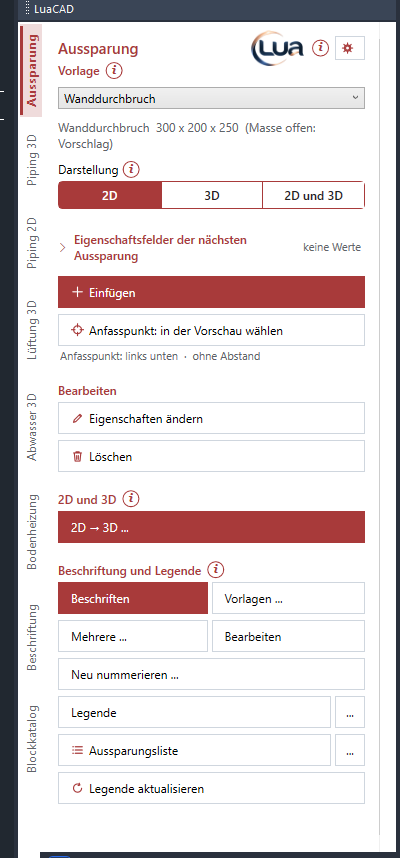
From top to bottom: Template and Display decide what the Insert button places; with Base point: choose in the preview you set beforehand at which point the opening hangs at the cursor. Below follow the sections for editing, for converting 2D to 3D and for output. What you choose in the palette applies immediately and only to openings you insert afterwards.
Tasks of this page: Choosing a template · Display · Insert · Base point · Property fields of the next opening · All settings of the page
Template and display
The template is a ready-made opening without a location: type, dimensions, clearance, disciplines, descriptions and the look in the plan. Below the list you see its name, its type and the dimensions inserting starts with. Display chooses whether a plan symbol (2D), a solid (3D) or both is created. The "i" next to Template tells you where to set up templates and the look by type: in the gear menu.
Tasks: Choosing a template · 2D, 3D or both · Managing templates · Display by type
Edit
Change properties opens the same dialog box as when inserting for an opening you click (2D or 3D); Delete removes the openings you click. A linked 2D/3D pair always changes and is always deleted together.
Tasks: Change properties · Fixed point · Delete · Grips and CAD commands
2D and 3D
2D → 3D … makes 3D openings out of 2D openings, with the bottom at elevation 0. Afterwards both are a fixed pair. The "i" at the heading explains what then changes together.
Tasks: Converting 2D to 3D · The fixed 2D/3D pair
Annotation and legend
Annotate places a text at an opening, Templates … designs the annotation templates, Multiple … annotates many at once, Edit changes a placed annotation. Renumber … assigns the numbers again. Legend and Opening schedule go into the drawing as a table (the schedule also as a file), "…" next to them opens their list options, Update legend recalculates the tables.
Tasks: Sequence number · Renumber · Annotate · Legend · Opening schedule · List options · Update legend
Keys at the cursor
While an opening hangs at the cursor, the action bar shows all keys that currently apply – to click or press. The same key means the same thing in all plug-ins; the complete list is in the Reference.
| Key | Meaning |
|---|---|
| Space | change the base point – show the markers on the outline, a click takes one |
| A | distance to a reference point, plus rotation and (3D only) elevation |
| R | rotate with the mouse; meanwhile the Space turns the 45° increment on and off |
| D | type the rotation angle |
| W | pick the angle (two clicks) |
| ← / → | rotate by 45° |
| Enter / Esc | back to the Dimensions dialog box – Cancel there ends |
The Help button in the bar opens the help for the running function.