
Manifold
The manifold has one outlet with supply and return per loop. The loops attach themselves: a new loop gets a free outlet of the nearest manifold, its connector point faces it.
Values of the next manifold
Goal: set what the next manifold looks like – before you insert it.
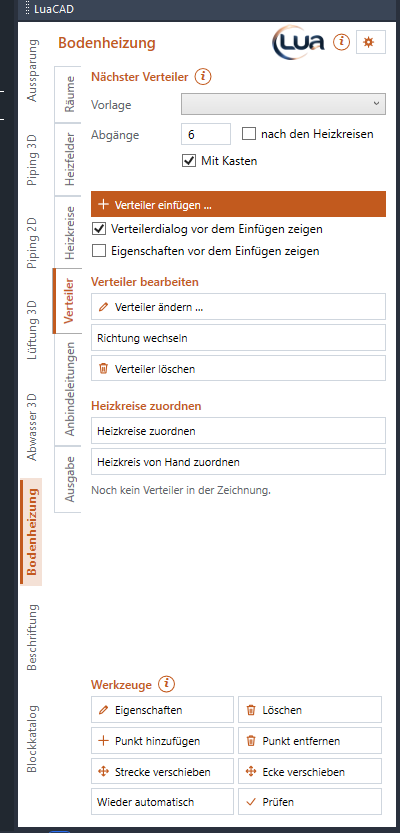
| Row | Effect |
|---|---|
| Template | A stored template brings all values – name, outlets, outlet spacing, cabinet, outlet side. "(no template)" = the values here. You create templates in the manifold dialog box. |
| Outlets, to match the loops | The number of outlets (1 to 24, default 4). With the check box to match the loops (on by default) the manifold gets as many outlets as loops are attached to it – updated after every assignment; the number is then grayed out. |
| With cabinet | The manifold cabinet as an outline (on by default); without: only bar and outlets. |
The systems are fixed: the first row carries the supply, the second the return of the heating. Which systems these are and what the cabinet looks like is set in Manifold options. If the values differ from the selected template, the note below says so.
Insert manifold
Goal: place a manifold at the wall.
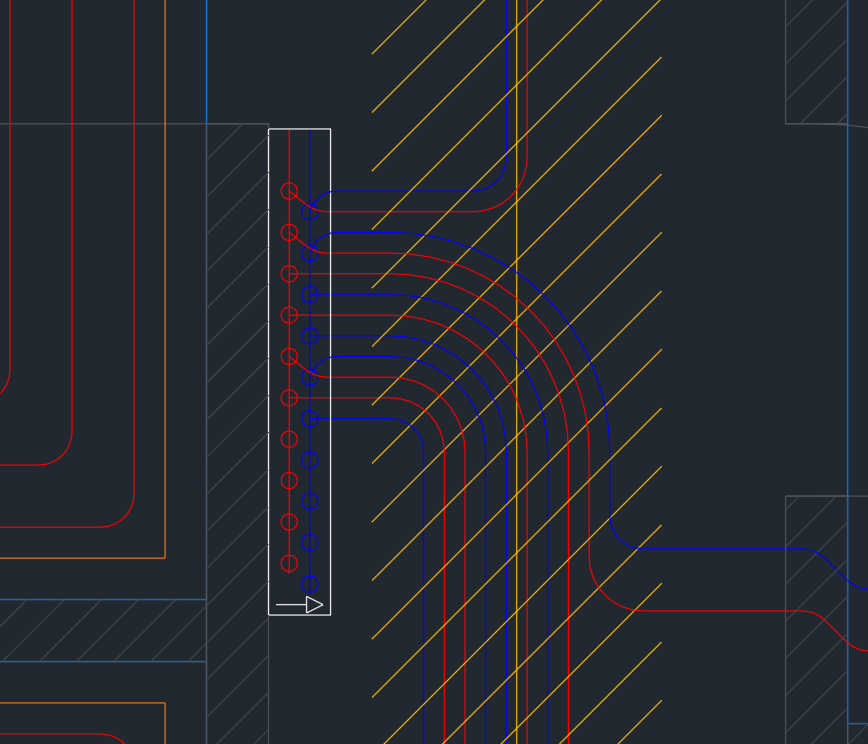
Steps
- Click Insert manifold ….
- With the check box Show properties before inserting (off by default) the property fields dialog box comes first; its values go to every manifold of this sequence.
- With the check box Show the manifold dialog box before inserting (on by default) the manifold dialog box comes with template, name, outlets, outlet spacing, cabinet and outlet side – OK. Without the check box the manifold hangs at the cursor right away with the palette values.
- Before the first click the insertion help shows the procedure.
- Click the insertion point (1) – usually the wall behind the cabinet (base point "center back (wall)").
- The loops without a manifold attach to it right away; their number shows manifold and outlet. The next manifold hangs at the cursor with the next name ("V1" becomes "V2"). Enter = finish. With the dialog box first, Esc returns to the dialog box.
Keys at the cursor
| Key | Effect |
|---|---|
| R | rotate with the mouse |
| D | type the angle |
| W | pick the angle at a wall (two clicks) |
| M | mirror in turn: top/bottom (side of the outlets), left/right |
| S | outlet side: the pipes leave the manifold at the front (into the room) or at the back (through the back wall) – the arrow in the cabinet shows it |
| Space | switch the base point: center back (wall), left back corner (wall), right back corner (wall), center front |
| A | distance to a reference point – see Inserting at a distance |
Change, flip and delete a manifold
Goal: adapt an inserted manifold.
| Button | What happens |
|---|---|
| Change manifold … | Click a manifold – the manifold dialog box with its values (title "Change manifold"): name, outlets (also afterwards), outlet spacing, cabinet, outlet side. Afterwards the assignment is updated; if outlets are missing, the command line names the loops without an outlet. |
| Flip outlet side | Click a manifold – the pipes then leave it on the other side (at the front into the room or at the back through the back wall); the arrow in the cabinet turns. The loops with automatic connecting re-orient toward it, the leaders follow. |
| Delete manifold | Click a manifold – it is deleted; its loops go to another manifold if there is one. One U brings it back. |
Every button runs in a loop – click the next manifold right away, Enter finishes. Properties and Delete in the tools also accept a clicked manifold.
Move a manifold with GstarCAD MOVE, ROTATE or MIRROR: the leaders follow.
Assign loops
Goal: distribute all loops of the drawing to the manifolds in order.
- Click Assign loops.
- Every loop goes to the nearest manifold; per manifold clockwise to the outlets from left to right – so nothing crosses. Loops assigned by hand stay where they are.
- The loops with automatic connecting orient toward the manifold (their connector point faces it). The command line shows the result ("8 of 8 loop(s) assigned to a manifold (3 changed).").
The line below the buttons shows the status: "2 manifolds – 8 of 9 loop(s) assigned, 1 without."
Assign loop by hand
Goal: put a loop on a particular outlet.
Steps
- Click Assign loop by hand.
- 1 of 2: click the loop.
- 2 of 2: click the manifold – at an outlet exactly that one (if it is taken, the two loops swap), otherwise the next free one. Esc = back.
- The command line confirms manifold and outlet with the remark "by hand – stays with Assign loops". The number of the loop follows the new outlet.
The choice by hand stays during automatic assignment. To release it: clear the check box "chosen by hand" in the Change loop dialog box.
Manifold options
Goal: set which system supply and return carry at the manifold and what cabinet and rows look like.
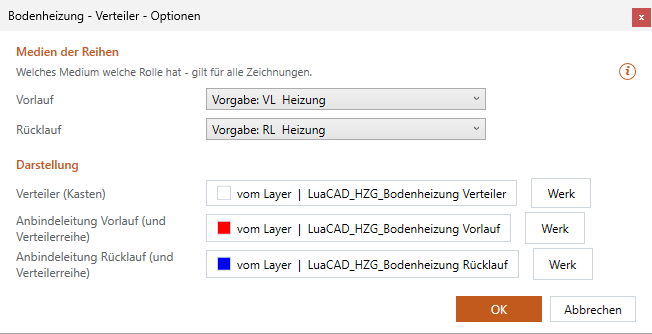
- Gear menu › Manifold options ….
- Systems of the rows: per role (Supply, Return) the system from the list. "Default: …" = the system LuaCAD finds as heating supply or return.
- Display: per button layer, color, linetype and lineweight of the cabinet or of the supply/return leaders (together with the rows of the manifold); Default restores the default display. These are the same values as under gear menu › Display.
- OK – applies to all drawings; the drawing follows a changed display in one undo step.