
Annotating
Annotating a part
Goal: place an annotation on a part of a plug-in, a block or another object.
- In the palette choose a template or leave Automatic.
- Click Annotate. The command line says "1 of 2: click the part, also another object (Enter ends)".
- Click the part – a pipe, fitting, duct, drain line, opening, a room of the floor heating, a block or a GstarCAD line. The part is highlighted.
- The finished annotation hangs at the cursor, as it will look. "2 of 2: click the position of the text (Template: list by plug-in, Esc: another part)".
- Click the position – placed. The command line asks for the next part; Enter ends.
Keys at the cursor
| Key | Effect |
|---|---|
| Click | step 1: choose the part – step 2: place the text |
| Template option | in step 2: choose another matching template |
| Esc | in step 2: back to step 1 (another part) |
| Enter | in step 1: done |
Options
- The arrowhead sits at the point of the part you clicked: on a pipe or duct on the centerline, in a 3D view on the point of the centerline closest to the click; on a line on its closest point; on a block at the height of its middle. Some templates set it themselves (a spot elevation at a connector).
- If the part already carries an annotation of the same template, it is replaced – except for elevations: a part may carry several of them (at different points).
- If the template gives no text for this part (all fields empty, "Only if" not met), the command line says that nothing was inserted.
- Every annotation is its own undo step. Another button in the palette cancels annotating and starts its own function.
- The plug-in of the part learns that it was annotated (the floor heating then colors its loops, for example, if this is set).
Switching the template at the cursor
Goal: take another template while the annotation hangs at the cursor, without going back to the palette.
- In step 2 click the Template option in the command line (or type it).
- The window shows all templates that apply to this part, grouped by plug-in (the part's plug-in first) – each with the text it gives here (or a note that it stays empty).
- Choose a template: double-click, Enter or OK. Cancel keeps the previous one.
- The command line names the template with its number and text; the annotation at the cursor shows the new template. Continue by clicking the position.
The chosen template comes first for the next part of the same plug-in (for this session).
Free text
Goal: insert text that is not tied to a part – a note, a room name, "existing".
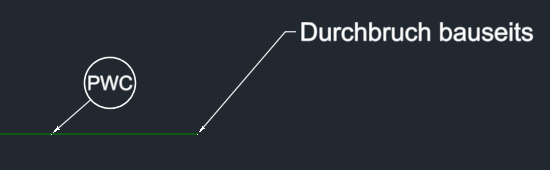
- Choose or create a template without a field (in the editor only text as content, for example "Existing – do not change"). Below the tree it says that it is free text inserted without an object.
- Annotate. The command line asks for the anchor point (arrowhead) – object snap works as usual (Enter ends).
- Click the anchor point.
- Then click the position of the text (Esc: another anchor point). The command line confirms that the free text is attached to no object and stays where it is.
With the form no leader there is only one step: click the position of the text. Free text is never updated; Multiple does not offer it (insert it one by one with Annotate). A double-click opens the GstarCAD text editor.
Elevations and spot elevations
Goal: write the elevation of a part or a point – absolute, from a level or above sea level.

- In the tree expand the Elevations folder of the discipline – for example Plumbing › Piping 3D › Elevations.
- Choose the matching template:
- Piping: centerline absolute, from level, from home level, above sea level, plus bottom / centerline / top from BOS;
- Drainage: the same four with the invert and the spot elevation at the clicked point (as in the Drainage 3D palette);
- Ventilation: four each for bottom, center and top, plus duct bottom from BOS;
- General: the elevation (Z of the arrowhead), the four "arrowhead" templates and bottom / top from FF (blocks, fixtures, other 3D objects).
- Annotate, click the part, click the position of the text – as for Annotating. The elevation applies at the arrowhead.
Options
- "From level" measures from the level of the drawing (in a project its level), "from home level" from the level in whose height range the arrowhead lies – see Elevation reference.
- "Above sea level" needs the sea level elevation of ±0 in the template: enter it in the editor › Elevation reference › sea level elevation (the default template has 0).
- If the drawing has no levels, the elevation is absolute; the command line says so.
- A part may carry several elevations; a new one replaces no existing one.
- A single annotation gets another reference in Edit annotation › elevations of this annotation.
- Changing level heights later never moves a part; the elevation "from level" is recalculated when updating.
Many parts at once: Multiple
Goal: place one template on many parts in one step – all pipes of an area, a whole network, the whole drawing.
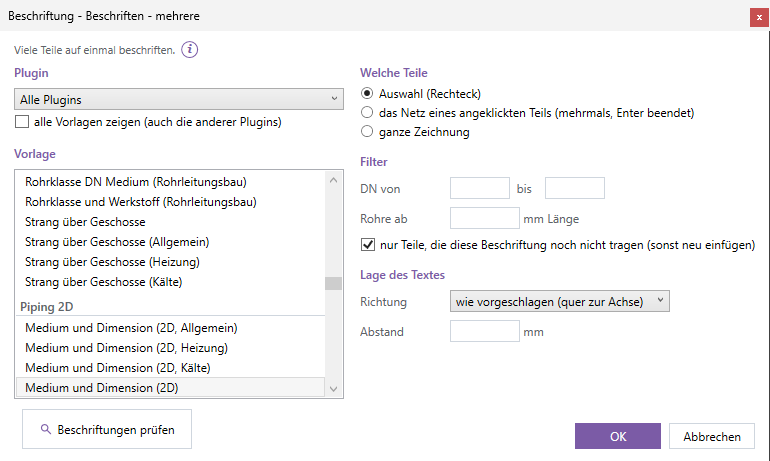
- In the palette Multiple … (the template selected in the tree is already selected in the dialog box; if objects are selected beforehand, "the selected objects (n)" is ready).
- At the left choose a plug-in if only parts of one plug-in should be annotated; the template list then shows the general ones and those of the plug-in (check box "show all templates (also those of other plug-ins)" shows all). Choose the template.
- At the right which parts: selection window (default), the network of a clicked part or whole drawing.
- Set the filter: part type, system, DN from/to, pipes from a length, "only parts that do not carry this annotation yet".
- Text position: direction (as suggested across the centerline, top/bottom right/left) and distance from the edge of the part.
- OK. With selection window drag a window and Enter; with network click a part of the network (several times possible, Esc back to the dialog box); with whole drawing it starts at once.
- The command line names the result: how many were placed or replaced, how many already had it, filtered out (with reason), where the template does not fit or gives no text. With many parts a window shows the progress.
Options
- Every text looks for a free position – if possible not over other annotations and parts, with a short leader (this does not always work). Direction and distance set the suggestion. Afterwards drag single texts into place with the grip.
- Whole drawing takes other objects only if the template names them explicitly (filter "other objects").
- Without "only parts that do not carry this annotation yet" existing annotations of the same template are placed again.
- Everything together is one undo step.
- Check annotations in the dialog box updates all annotations and shows those without a part – like Check.
- The settings are remembered; Esc while clicking returns to the dialog box, only Cancel there ends.
Item numbers and dimensioning
Item numbers (balloons in a circle) and dimensions belong to the parts of a plug-in and are therefore found there: Piping 3D – item numbers, Ventilation 3D – item numbers and dimensioning, Drainage 3D – spot elevations. The templates of the balloons are in the tree under Item numbers here and can be designed like any template.