The highlighted button Insert … (in the color of the plug-in) puts something new into the drawing; all other buttons change, check or output. Every button and every tile shows a tooltip when you hover over it. A button with a crosshair picks a value from the drawing, an "i" opens an explanation.
The same key means the same in every plug-in. Which one applies right now is shown by the action bar; Shift and Ctrl are never assigned at the cursor (they belong to the CAD).
Key
Meaning in the Block Library
Space
show the base points (insertion point, corners, midpoints, connectors), a click takes one; when rotating with the mouse: 45° increment on/off
G
free base point: click any point on the block with object snap – also in the choice of base points
A
Enter distance dialog box: amounts X/Y, base point, rotation, elevation (3D only)
R
rotate with the mouse
D
type the rotation angle (degrees)
W
pick the angle – always two clicks; the front lies to the left of the direction
M
mirror left/right; fixtures: cold water stays on the right
← / →
rotate by 45°
Enter
done – back to the palette
Esc
back to the palette; in a choice (base point, angle): back without a change
In the block wizard and when detecting in the plan, Enter (confirm or "none") and Esc (cancel) apply.
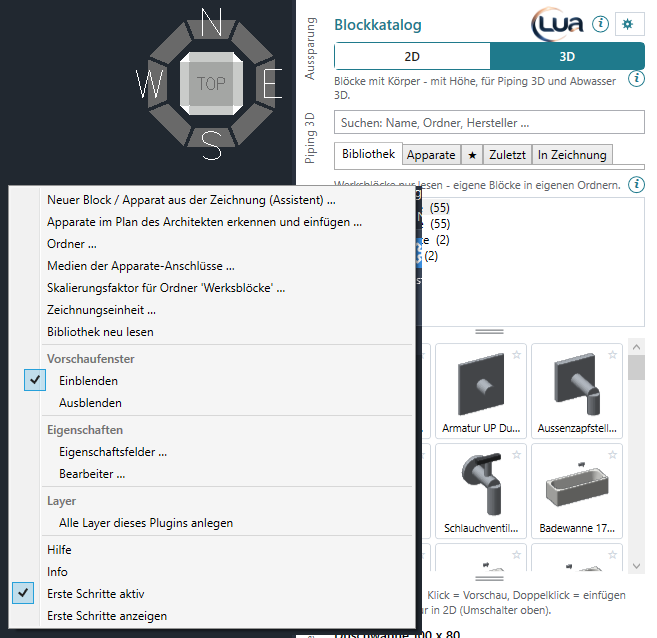
The gear menu of the Block Library open: wizard, fixtures in the plan, folders, systems of fixture connectors (1), scale factor for the folder 'Standard blocks', drawing units, reload library (2), preview window (3), properties (4), layers (5), help and info (6), getting started (7)
The name in lists, IFC and the clash list – for all plug-ins.
Layers › Create all layers of this plug-in
Creates the layers of the standard blocks that are missing; existing ones stay as they are.
Help
Opens this online help of the Block Library in the browser.
Info
Version of LuaCAD and contact.
Getting started active
Cards of the pages and the help before inserting for this plug-in on or off.
Show getting started
The tip assistant leads step by step through the shown page.
The LuaCAD settings (for all plug-ins) are on the ribbon › LuaCAD tab › Info – see Getting started. Systems, levels and system elevations are maintained in the plug-ins that draw pipes (for example Piping 3D); the Block Library reads the levels only for the elevation from level.
Picture coming soonThe dialog box "Insert fixtures automatically": heading with the number of locations (1), per row check box, number, standard fixture, how detected, Show (2), the line about the warning sign (3), All / None (4), A fixture is missing? with type and Click an example (5), Insert n fixtures / Cancel (6)
Opens after choosing the area (Fixtures page › Detect fixtures in the plan and insert …); it is placed on the right of the main window so that the plan with the numbers stays visible. At the top an "i" with the explanation.
Element
Effect
Heading
"n location(s) – the numbers are in the plan: green = will be inserted, gray = not." Without a find: "No fixture was detected in the plan …"
Check box
Insert this location. Checking it with "– do not insert –" gets the suggested standard fixture.
Number
The same number as in the plan.
Standard fixture (list)
Which standard fixture is inserted; "– do not insert –" takes the location out. Another choice is remembered for the next plan. Focus on the list highlights the location in the plan.
How detected
Block name or shape; ⚠ = direction not recognized from a wall. Tooltip: origin and direction.
Show
Zooms to the location.
All / None
Set or clear all check boxes.
A fixture is missing? – type, Click an example …
Catch up on an undetected type with an example – see Click an example.
Insert n fixtures (Enter)
Place the checked standard fixtures; gray as long as none is checked.
Picture coming soonThe Block wizard dialog box: line "Detected: …" (1), Block with name, store in, subfolder, type / code with "i", fixture type (2), default values (3), Create connectors with drainage, routing, template horizontal, in-wall carrier code, cold water, hot water, DN (4)
Opens in the block wizard after the selection and the insertion point. At the top an "i" (rules for fixtures), below it "Detected: n solid(s) (3D), n 2D objects, n connector(s) of the plug-ins." Every field: Block wizard in detail.
Area
Content
Block
Name, store in (only folders you may write to – never the standard blocks), subfolder, type / code, fixture type.
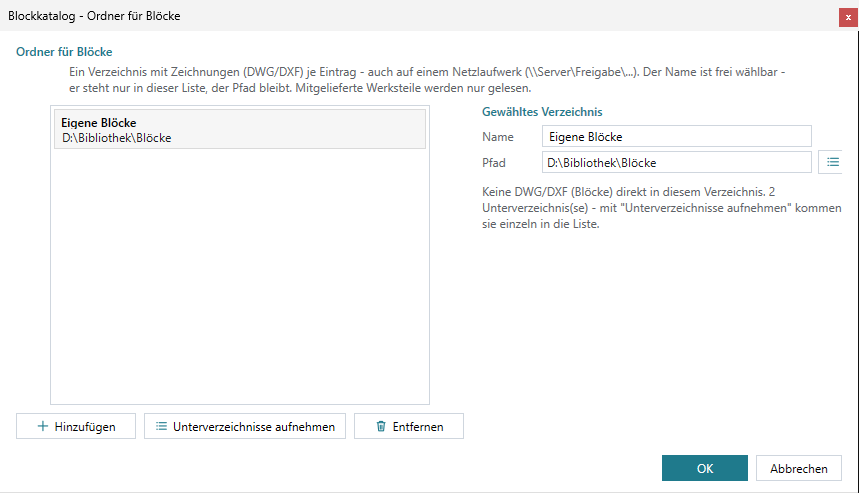
The dialog box "Block Library – Folders for blocks": the list, here with the entry "Custom blocks" (1), Add, Add subfolders, Remove (2), Selected folder with name and path (3), the contents (4), OK / Cancel (5)
Gear menu › Folders …. On the left the list of your folders (with path; "not found" if the folder is missing; "supplied part" for supplied ones), below it Add, Add subfolders, Remove. On the right Selected folder: Name (as it appears in the tree) and Path (type it or choose it with the button), below it what it contains. OK saves the list and the selected entry, as does a double-click on an entry; Cancel discards. Every field: Folders in detail.
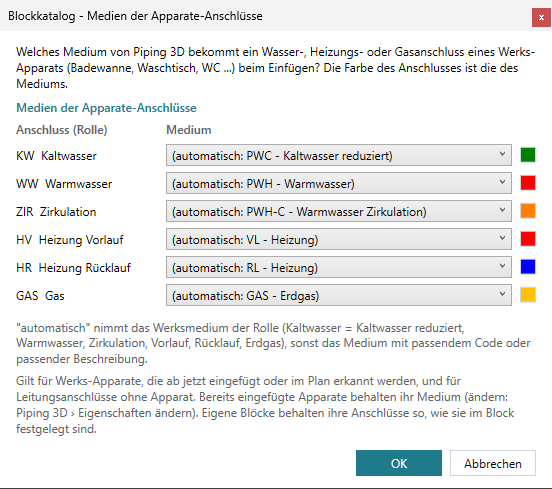
The dialog box "Block Library – Systems of fixture connectors": introduction (1), columns Connector (role) and System (2), per role list and color field (3), the explanation of "automatic" and the note (4)
Gear menu › Systems of fixtureconnectors …. Per role (cold water, hot water, recirculation, heating supply, heating return, gas) a list with "(automatic: …)" and all Piping 3D systems, on the right the color field of the choice. OK saves, Cancel discards. If Piping 3D has no systems, a red note appears. Every setting: Systems of fixture connectors in detail.
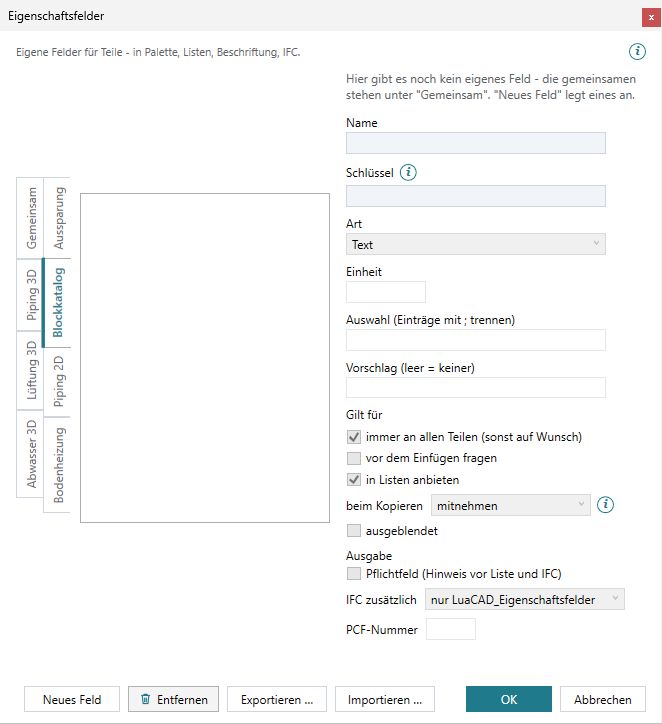
The Property fields dialog box on the Block Library tab: tabs Common and one per plug-in (1), the list of the fields – still empty here because there is no field of your own (2), New field / Remove / Export / Import (3), the attributes of a field (4)
Gear menu › Properties › Property fields … – the same dialog box in all plug-ins, opened on the Block Library tab. It decides which fields blocks and fixtures have. On the left the fields of the tab (default fields gray with a lock – hide only), below them New field, Remove (only a new field not yet saved), Export … and Import … (an XML file, for example for the whole office). On the right the attributes of the selected field. OK saves for all plug-ins; the palette rebuilds its fields afterwards. Every attribute: Property fields in detail.
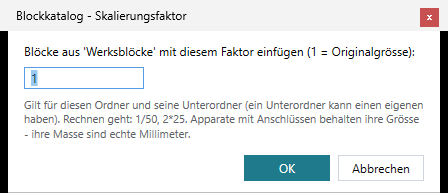
The Scale factor dialog box: "Insert blocks from 'Standard blocks' with this factor (1 = original size):" (1), the field (2), the note (3), OK / Cancel (4)
Right-click a folder › Scale factor … or gear menu › Scale factor for folder '…' …. A field for the factor (you may calculate), below it the note about subfolders and fixtures. An invalid value: "Please enter a number greater than 0 (for example 50 or 1/50)."
Right-click a folder › New folder … or Rename …. The question names the folder, the field is preset with a free name ("New folder", "New folder 2" …) or with the previous one; when renaming, the note "Favorites and recent move along …". OK checks the name – if it is invalid or already exists, the reason appears in red below. See Creating, renaming, deleting folders.
Picture coming soonThe "Enter distance" dialog box: amounts X and Y (1), the 3 × 3 field with the base points of the block (2), rotation (3), elevation (4), OK (5)
Opens at the cursor with A. X and Y are amounts in the axes of the block (X along the wall, Y into the room), 0 and 0 = no distance; the 3 × 3 field shows the base points of the block – a click chooses one, the side of the distance follows it. Plus Rotation and – in 3D only – Elevation (absolute, from level or free with the mouse). At the top an "i". After OK click the reference point. See Inserting at a distance.
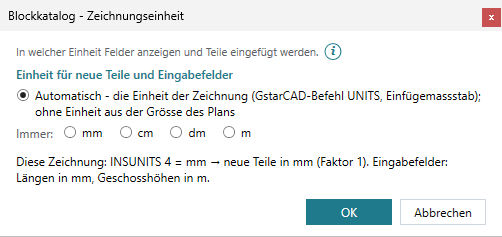
The Drawing units dialog box, opened from the gear menu of the Block Library: the choice of units – automatic or always mm, cm, dm, m (1), OK (2)
Gear menu › Drawing units … – the same dialog box in all plug-ins: in which units fields show lengths and new parts go into the drawing (automatic, mm, cm, dm, m). A block stays in the units of its DWG and goes in with the matching factor. Details: Drawing units.
Here is every setting of the Block Library – in the palette, in the gear menu and in the dialog boxes – with its effect, the default value and an example. Values in the palette apply only to blocks you insert afterwards and are saved right away (also across a restart). A "–" in the "Default" column means: the value depends on the library or the data. Number fields calculate ("600+400" becomes 1000).
3D: show blocks with solids and insert them with solids at their elevation. 2D: show blocks with 2D parts and insert them in the drawing plane, connectors as marks. Filters tree, tiles, favorites, recent and search; a selected block that does not exist in the new mode is deselected.
3D
2D for a floor plan with Piping 2D
Search
Every typed word must occur in the name, the folder path or the name of the library; upper/lower case and umlaut spelling do not matter. Applies on all pages.
These pages have no settings of their own apart from the tiles; switch, search and the "next block" area apply. The Fixtures page shows all blocks from folders named Apparate (custom ones too), Recent at most 20 blocks.
Which blocks Show, Common properties and Apply affect (Ctrl/Shift-click for several). Stays after applying.
none
all toilets of a level
Common properties (per field)
A new value for all selected blocks; an unchanged field stays as it is per block. Shown are the property fields with "always on all parts" for blocks/fixtures and the dimensions.
The connector set of the selected fixture; remembered per fixture, also applies to detecting fixtures in the plan. Only for fixtures with several connector sets.
A (default set)
B – valve on the side wall
Properties of the next block
The fields with "ask before inserting" for blocks; every value goes to every following block, ahead of the defaults of the DWG. Empty = default of the DWG. Collapsed, the heading states how many are filled in.
The drain of the next standard fixtures: by fixture type (default) = toilet, lavatory, urinal, bidet into the in-wall carrier, bathtub, shower, appliances, sink below ceiling / in the floor; In-wall carrier or Below ceiling / in the floor for all. Gray for custom fixtures; fixtures in 3D only.
by fixture type (default)
below ceiling / in the floor in an old building without carrier
absolute elevation = the Z coordinate; from level = level, reference level and value from it; free = the elevation of the clicked point (object snap takes the elevation of a part), then without a value. Switching keeps the elevation. 3D only.
absolute elevation
from level
Level
Only with from level: its reference levels apply – preset with the level of the drawing.
level of the drawing
1st floor
Distance from
The reference level TOS, BOS, FF or FC; its elevation in the chosen level in brackets.
–
FF
Value
With absolute elevation the Z coordinate, from level the value from the reference level (negative = below). Applies right away; while inserting, a new number applies from the next insertion (at the cursor: A). The check mark and Enter take it over.
0
0
Crosshair (pick elevation)
Click a point with object snap – its elevation applies, with from level as the value from the chosen reference level, in the level of the point.
–
the top of a pre-wall
Levels and their reference levels are maintained in the project or in the gear menu of a piping plug-in – see Elevations and reference levels.
"automatic" takes the default system of the role, otherwise the system with a matching code or description; what it finds today is shown in brackets. The color field shows the color of the connector.
for a whole, saved drawing its file name, otherwise empty
Double lavatory 80
Store in
The library folder to save in – only writable ones, never the standard blocks.
the first writable one
Custom blocks
Subfolder
Path below this folder, separated by /; it is created. If it lies under Apparate, the block also appears on the Fixtures page.
Apparate/… from the code
Apparate/Waschtische
Type
Fixture (with connectors, category plumbing) or Block (geometry only).
fixture
block for a piece of furniture
Code
WC, WT, HWB, DWT, UR, BI, DU, BW, SP, WM, TR, GS, AG, BA – determines the IFC class and suggests the values of the connectors (when leaving the field).
WT
DU
Fixture type
For the DU suggestions in Drainage 3D.
from the code
shower tray
Description, manufacturer, article number, type
Default values of the property fields; article number empty = the block name. Text, never calculated.
description = name
–
W × D × H
Width, depth, height – measured from the selection (height from the insertion point).
measured
800 × 500 × 850
Drainage
Create a drain.
from the code
on
Routing
In-wall carrier or below ceiling / in the floor – the default of the one drain (switchable in the palette).
Whether the preview window stands next to the palette. Display, view direction and base point are set in the window itself.
Author …
The name in lists, IFC and the clash list – for all plug-ins, empty by default.
Layers › Create all layers of this plug-in
Creates missing layers of the standard blocks (for example for an office template); existing ones stay as they are. Custom blocks have no LuaCAD layer.
Getting started active
Cards of the pages and the help before inserting for this plug-in on or off.