
Working with LuaCAD
What is described here works the same in every plug-in.
Opening and switching plug-ins
- Ribbon › LuaCAD tab › Plug-ins ribbon panel and click a plug-in. On the Home tab, the LuaCAD button at the far left takes you there.
- The palette opens at the edge of the drawing area. If a plug-in is already open, a plug-in tab is added on the left; clicking it switches plug-ins.
- Gear menu › File › Exit closes the palette of a plug-in. Its settings stay saved.
Entering values
- You may calculate in any number field: "600+400" gives 1000, "2*450" gives 900.
- Lengths are shown in the drawing units; a suffix always applies ("1.2m", "250cm").
- If a function is running at the cursor and you change an elevation on the palette, it only applies after Enter or the check mark next to it – until then the field is highlighted. If nothing is running, the value applies at once.
- The Pick button (crosshairs) next to a field picks the value: click a point, an elevation or an angle in the drawing; object snap helps.
- A list of layers shows the layers of the drawing; empty = "from the CAD".
Choosing the elevation
In every input with an elevation you choose the method:
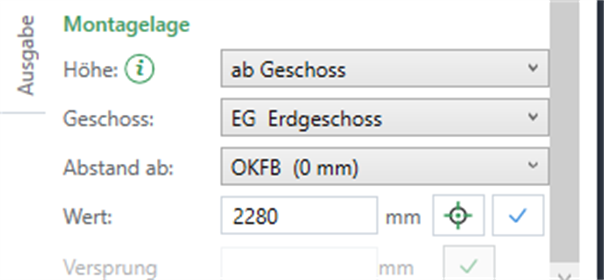
- Method: absolute elevation, from level, system elevation (Piping only) or free.
- For "from level" first the level, then the reference level (TOS, BOS, FF, FC – with its elevation in brackets) and the value.
- "Free" = the elevation comes from the point you click.
If you switch the method, level or reference level, the elevation stays the same – only the number is converted.
If an input shows the elevation of a pipe already drawn (change elevation, picked elevation), it shows a system elevation only if a current system elevation lies exactly at that height – otherwise the absolute elevation. Why: Pipes already drawn never follow the system elevations.
Selecting objects
- Click an object – the cursor becomes the pickbox. Further clicks add objects.
- Click next to the objects and drag a selection window to select everything inside.
- Enter accepts the selection, Esc cancels – the command then does nothing.
If you already selected objects before (preselection), the tool uses them right away.
Inserting at a distance
Goal: insert a part at a fixed distance from a point, for example 100 mm from the wall corner.
- As long as nothing has been placed yet, press A.
- In the dialog box choose the values X/Y and the base point (the 3 × 3 field shows where you hold the part).
- OK – the part hangs at the cursor. Click the reference point (red cross; object snap helps).
- The distance applies to all further parts of this command; the Space key switches the base point, the distance stays.
While drawing a pipe, A instead opens the elevation and the wall offset.
Typing and picking an angle
- D: type the angle on the command line (degrees); Enter without a number leaves it as it is.
- W: pick the angle with two clicks – the direction from the first to the second point. Esc = back without a change.
- R: rotate with the mouse.
Reviewing issues
If, after a workflow, something was not built the way it should be, LuaCAD shows the issues list at the bottom right – only when there is something to report.
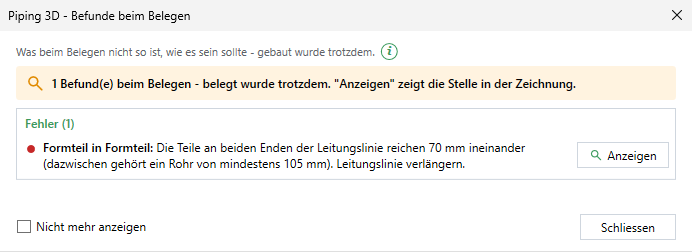
- Errors (red) usually need an adjustment, notes (orange) are information.
- Show (or a click on the row) shows the place: the view zooms there, the parts are highlighted and a sphere marks the spot. The drawing does not change.
- The window stays open while you keep working. "Don't show again" switches it off per plug-in – switch it on again in the gear menu › Options.
Undo
Every LuaCAD command is one undo step – even if it changes many parts or updates adjacent ones. U (or Ctrl+Z) undoes it completely. In runs, Esc only removes the segment at the cursor; the segments already placed stay.
Changing settings
- LuaCAD settings (LuaCAD tab › Info): what applies to all plug-ins – author, drawing units, welcome window, notices you switched off, getting started, updates, export and import settings (transfer to another computer), default settings.
- Gear menu of a plug-in: what concerns only this plug-in – systems, layers, attributes, options.
- A change applies at once; only default settings and importing for settings, systems and templates take effect at the next start.
Using the help
- "i" of a palette page or a dialog box: one sentence, below it "More in the online help".
- Insertion help: the window with a picture before special workflows; Online help opens the same workflow here.
- Help button in the action bar at the cursor: the help for the running function – the function keeps running.
- Gear menu › Help: the help of the plug-in; "Show getting started" shows the cards again.
More in Help in the program.