
Fixtures
Standard fixtures
Goal: know which fixtures are supplied and what they bring.
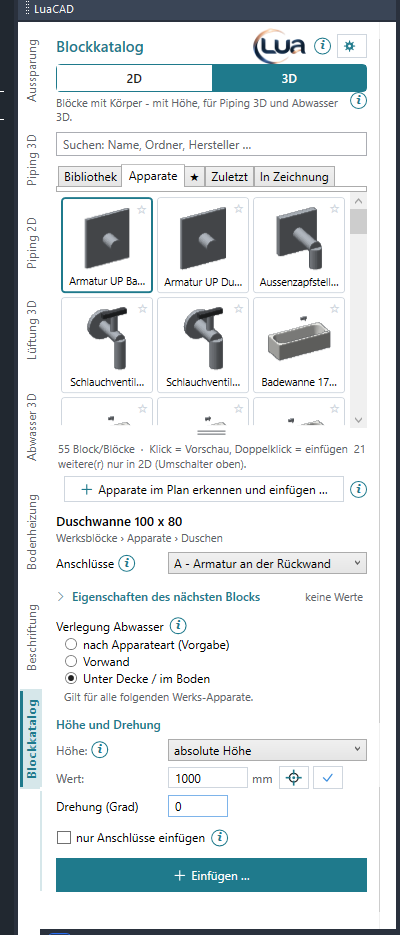
The Fixtures page lists all blocks from folders named Apparate. The standard fixtures are supplied – in the groups valves, bathtubs, bidets, floor drains, showers, laundry, kitchen, urinals, lavatories, water heaters and toilets. Each one has:
- a solid in 3D and a floor plan in 2D – so it appears in both modes,
- the water connectors (cold water, hot water; more where needed) and a drain at the right position and elevation,
- its insertion point at the wall, in the middle, on the floor,
- default values for the property fields and the dimensions (width, depth, height).
Some have two connector sets – see Connector set. Only standard fixtures accept the drainage routing and the systems of fixture connectors; a custom fixture keeps its connectors exactly as they are defined in the block.
Inserting a fixture against a wall
Goal: place a fixture parallel to the wall with its back against the wall.
- Choose the fixture and Insert ….
- Press W and click two points along the wall – so that the room lies to the left of the direction. The fixture turns parallel to the wall, its front faces the room.
- Click the insertion point (middle of the back) onto the wall.
- In a corner: with the Space take the corner "left back (wall)" or "right back (wall)" as the base point and click the corner of the room – with A also at a distance.
D types the angle, M mirrors a corner model to the other side.
Detecting fixtures in the plan and inserting them
Goal: find all toilets, lavatories, showers … in an architect's floor plan and place the standard fixtures right there.
- Fixtures page › Detect fixtures in the plan and insert … (or gear menu › Detect fixtures in the architect's plan and insert …).
- Select the area of the floor plan and press Enter – or just Enter for the whole plan. A selection made beforehand applies. Objects inside blocks, xrefs and IFC elements are read too.
- LuaCAD detects the fixtures (blocks with a matching name or exploded lines with a matching shape) and states the number of locations in the command line. Their numbers appear in the plan: green = will be inserted, gray = not.
- In the dialog box Insert fixtures automatically (on the right of the window so the plan stays visible) check each row: check box = insert, the type (standard fixture) can be changed or set to "– do not insert –", Show jumps to the location. All / None set or clear all check boxes.
- A fixture is missing: Click an example.
- Insert n fixtures (or Enter) places the standard fixtures – with the back centered against the wall, the front into the room. Esc or Cancel inserts nothing.
What applies from the palette: the 2D | 3D switch, the "connectors only" check box, the elevation (absolute or from level; with "free" 0), the drainage routing and the connector set remembered per fixture. In a corner LuaCAD chooses the wall so that the connectors go to the wall with the pipes. All fixtures of one run are one undo step.
Options
- A ⚠ in front of a row means: the direction was not recognized from a wall or corner. The fixture is inserted anyway but may be turned the wrong way – look at it with "Show" and check it after inserting.
- What you change in the list (another type, "do not insert") LuaCAD remembers for the next plan – per block name or per shape.
- If the plan is drawn in other units than your preset, the fixtures go in the units of the plan so that they lie on it; the command line says so.
A fixture is missing: click an example
Goal: catch up on a fixture type that was not detected, with an example.
- In the dialog box under A fixture is missing? choose the type (toilet, lavatory, shower, bathtub, sink, urinal, bidet, washing machine, dryer, dishwasher, service sink, floor drain).
- Click an example … – the dialog box closes. Click a line of such a fixture in the plan. Esc = back to the list.
- If the line lies in a block of fixture size, LuaCAD remembers its name: from now on all blocks of this name are this type. Otherwise LuaCAD searches all identical shapes and remembers the shape.
- The list comes back, the new locations are checked; the command line states their number.
"There is nothing I can read there" means: there is no line, arc or polyline at that point. "I find no shape for this example": the lines do not form a closed shape – click another piece of the fixture.
Drainage routing
Goal: decide whether the drain of the next standard fixtures goes into the in-wall carrier or horizontally below the ceiling or into the floor.
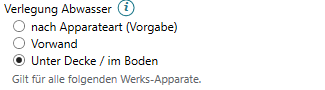
- Choose a fixture (switch on 3D). Drainage routing appears below the selected block.
- Choose:
- by fixture type (default) – toilet, lavatory, urinal, bidet into the in-wall carrier; everything on the floor (bathtub, shower, appliances, sink) below ceiling / in the floor,
- In-wall carrier – for all following standard fixtures,
- Below ceiling / in the floor – for all following standard fixtures.
- Insert – the drain of every following standard fixture has this routing.
The choice stays remembered and also applies to detecting fixtures in the plan. For a custom fixture it is gray: its connectors apply as they are defined in the block. In 2D it is not used. Switch a placed fixture in the Properties palette (on the drain).
Systems of fixture connectors
Goal: decide which Piping 3D system the water, heating and gas connectors of the standard fixtures get – and with it their color.
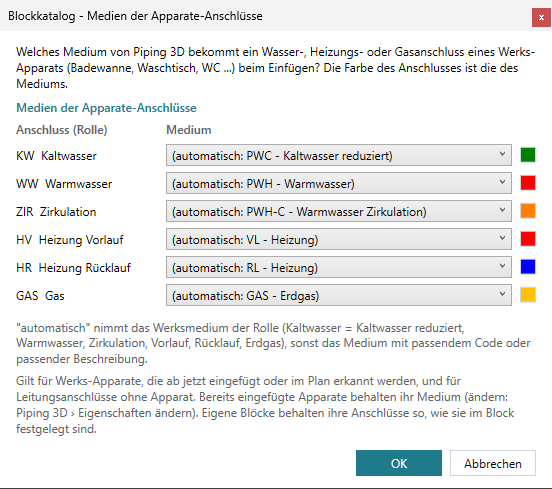
- Gear menu › Systems of fixture connectors ….
- Choose the system per role. The first entry (automatic: …) names what applies without a fixed choice: the default system of the role (cold water = reduced-pressure domestic cold water, domestic hot water, recirculation, heating supply, heating return, natural gas), otherwise the system with a matching code or description.
- The color field on the right shows the color the connector gets.
- OK – the command line says how many roles have a fixed assignment.
It applies to standard fixtures inserted or detected in the plan from now on, and to pipe connectors without a fixture. Placed fixtures keep their system (change: Piping 3D › Change properties); custom blocks keep their connectors. The systems themselves are maintained in the system definitions of Piping 3D. Every setting: Systems of fixture connectors.
Mirrored fixtures
Goal: place a fixture mirror-inverted without cold and hot water ending up the wrong way round.
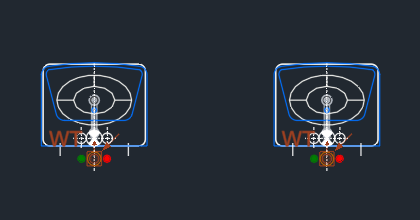
- At the cursor press M – or mirror a placed fixture with MIRROR of GstarCAD.
- Shape and drain are mirrored; cold and hot water swap places so that cold water stays right, hot water left (seen from the front).
- The command line says so for the first mirrored fixture or after MIRROR ("n fixture(s) mirrored – cold water stays on the right …").
With a connector set LuaCAD applies the same rule to the positions of the chosen set. In 2D the marks swap the same way.
Changing the connector set
Goal: use the other connector set on a placed fixture – for example the shower valve on the side wall instead of the back wall.
- Select the fixture (or several), right-click › LuaCAD › Change connector set – or start the command without a selection and click the fixture.
- The command line asks "Choose connector set (A – …, B – …)". Click or type the set; Enter takes the next set.
- The connectors move to the positions of the new set, connected pipes follow. The command line says "n fixture(s) changed to "…" – connected pipes follow."
Or choose another set in the Properties palette › LuaCAD › Connector set. If a connector disappears at which a pipe ends, LuaCAD asks: Reconnect to … (the pipe end moves along to the new connector) or Leave pipe open (the pipe stays where it is, its end is free afterwards); Cancel leaves the fixture as it is.
Connecting pipes
Goal: draw pipes from a fixture – in Piping 3D, Piping 2D or Drainage 3D.
- Piping 3D: start a run at a water connector of the fixture – it takes over system and nominal size. The button "Fixtures from the block library …" (Risers/connectors page) opens the Block Library directly on the Fixtures page in 3D.
- Piping 2D: connect to the colored marks of a 2D fixture; Piping 2D opens the Block Library in 2D.
- Drainage 3D: the drain is a drainage connector with template and routing; the plumbing line starts there.
- Convert 2D to 3D: "Convert to 3D" in Piping 3D turns a 2D fixture into the same fixture in 3D – its block DWG must be found on this computer, otherwise it stays 2D and the command line says so.
See Piping 3D › Fixtures from the block library and Drainage 3D › Fixtures from the Block Library.