
Editing and updating
Edit annotation
Goal: change one or several placed annotations – template, prefix or suffix, elevation reference, form or layer.
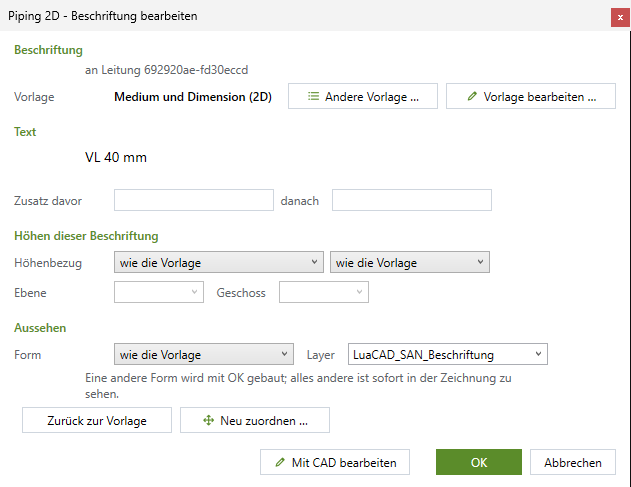
- In the palette Edit and click the annotation – or select it beforehand (several too: then the values apply to all together), or double-click it, or right-click › LuaCAD › Edit annotation.
- The dialog box names the annotation "on <part>" (plus "waiting" or "orphaned" when it is not attached) and shows its text.
- Change what is needed – every change is visible in the drawing at once:
- Other template …: another matching template (window as at the cursor, with the text for this part);
- Prefix / suffix: text before the first or after the last line ("approx.", "(existing)");
- Elevations of this annotation: elevation reference, plus sign, reference level, level – "as the template" or overridden;
- Form and layer.
- OK applies (another form is only built with OK), Cancel restores everything.
Options
- What is overridden here is stored on the annotation, not in the template; the dialog box says so. It also applies when updating.
- For free text "Other template …" only offers free templates.
- Everything together is one undo step.
- Every field: Edit annotation in detail.
A new template for placed annotations
Goal: give placed annotations the current state of their template on purpose – for example after you changed the template.
A placed annotation does not follow its template by itself (Snapshot). Three ways in the dialog box Edit annotation give it a new snapshot – always only to the selected annotations:
- Reset to template: remove everything overridden here – also a manually edited text – and take the template as it is now. The dialog box then says that the text is updated again; OK applies.
- Other template …: the chosen template in its current state.
- Edit template …: opens the template editor on this template; after saving, the annotations edited here get the changed template, all other placed ones stay.
Changing the text freely: Edit in CAD
Goal: write a text freely as an exception, as usual in GstarCAD.
- In the dialog box Edit annotation click Edit in CAD (only for a single annotation).
- If you already changed something in the dialog box, LuaCAD asks whether these changes may be dropped.
- The GstarCAD text editor opens on this annotation. Change the text, close.
Afterwards the text counts as edited manually and is no longer updated; the dialog box shows this in orange, Check counts such texts. Reset to template removes this.
Double-click and shortcut menu
- A double-click on a LuaCAD annotation opens Edit annotation – also on blocks and other objects. Free text and every other multileader go to the GstarCAD text editor.
- Right-click a selected annotation › LuaCAD › Edit annotation.
Dragging grips
Goal: adjust an annotation without a LuaCAD command.
- Drag the text or the landing: the position of the text changes, the arrowhead stays on the part.
- Drag the arrowhead (grip, STRETCH): if the new tip lies on its own part (on the centerline, on the outline of a block), this becomes the new anchor point and the command line confirms it. If it lies beside the part, it goes back to the previous anchor point. Reassign attaches it to another part.
- MOVE an annotation alone (without its part): the text stays where you put it; the arrowhead returns to its part at the end of the command.
- Color, layer or text height of a single annotation set in the GstarCAD Properties palette stay as you set them.
How annotations follow their part
After every command that changes parts (MOVE, a grip, another size, generating 3D again, a plug-in command) LuaCAD updates the affected annotations – in the same undo step:
- the text shows the new values of the part (size, system, length, elevation …), in the language it was placed in;
- the arrowhead moves with the part; the text keeps its distance to the tip;
- an elevation "from level" is calculated with the current levels;
- when the 3D of a part is generated again, the annotation finds the new part through its line;
- when the part is gone, the annotation is marked (layer "Orphaned annotation") or deleted – depending on "Part removed" of its template.
Not updated are: free text, manually edited text, and the look and content from the template (snapshot). Undo/redo updates nothing – GstarCAD resets the drawing including the annotations. When opening a drawing and when the levels change, all annotations are updated.
Check
Goal: bring all annotations of the drawing up to date and find those that have no part any more.
- In the palette Check (or gear › Check annotations, or in the Multiple dialog box › Check annotations).
- LuaCAD updates all annotations of the drawing.
- The command line counts: how many annotations, how many orphaned, how many waiting for their part (line still there), how many edited manually.
- If there are orphaned or waiting annotations, LuaCAD zooms to them and selects them, with the hint that Reassign attaches one to its part.
Check opens no dialog box; the result is in the command line. What the states mean: State.
Reassign
Goal: attach an annotation to another part – for example after a line was drawn again.
- In the palette Reassign. "1 of 2: click the annotation (Enter ends)".
- Click the annotation – it is highlighted.
- "2 of 2: click the part it belongs to (Esc: another annotation)" – click the part.
- The command line confirms which part the annotation is now attached to. The arrowhead goes to the part, the text stays where it is and shows the values of the new part; overrides stay.
In the dialog box Edit annotation, Reassign … leads straight to step 3 after OK. Every assignment is its own undo step.