
Openings reference
The buttons of the palette
Highlighted (in the color of the plug-in) are the buttons that place something new in the drawing: Insert, 2D → 3D … and Annotate. All other buttons change, delete or output. Every button shows a tooltip when you hover over it, an "i" opens an explanation.
Openings palette
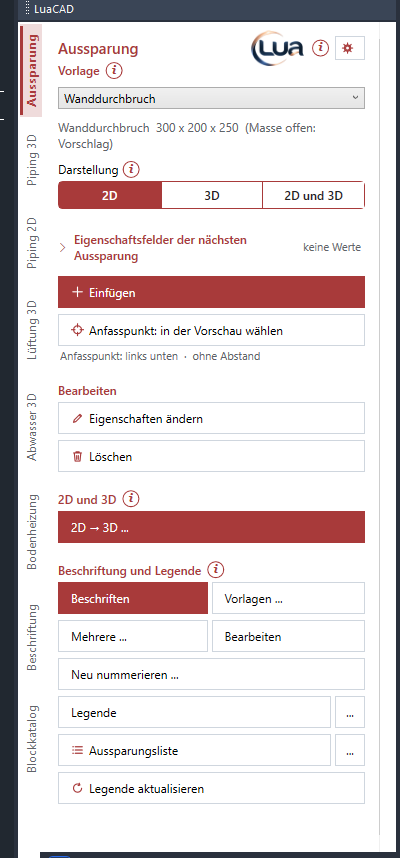
| Element | Effect | More |
|---|---|---|
| Title bar: name, logo, "i", gear | "i": what the palette does, with "More in the online help"; gear: the menu of the plug-in. | The gear menu |
| Template (with "i"), list, line below it | The template of the next opening; below it name, type and dimensions. The "i" tells you where templates and display by type are set. | Choosing a template |
| Display (with "i"): 2D, 3D, 2D and 3D | What Insert creates. | Display |
| Property fields of the next opening (expandable) | Values for every new opening. | Property fields |
| Insert | Dimensions dialog box, then the opening at the cursor. | Insert |
| Base point: choose in the preview (with "i"), line below it | Choose the point by which the opening hangs at the cursor, plus a distance; below it what applies. | Base point |
| Edit › Change properties | Click an opening and change it in the dialog box; the partner follows. | Change properties |
| Edit › Delete | Click openings one after the other and remove them; a pair goes together. | Delete |
| 2D and 3D (with "i") › 2D → 3D … | Make 3D out of 2D openings, bottom at elevation 0. | Converting 2D to 3D |
| Annotation and legend (with "i") › Annotate | Annotate an opening from a template. | Annotate |
| … › Templates … | Design the annotation templates. | Annotate |
| … › Multiple … | Annotate many openings at once. | Several |
| … › Edit | Change a placed annotation. | Editing an annotation |
| … › Renumber … | Assign all numbers again. | Renumber |
| … › Legend, "…" | The legend as a table; "…" = list options of the legend. | Legend |
| … › Opening schedule, "…" | The schedule as a table or file; "…" = list options of the schedule. | Opening schedule |
| … › Update legend | Recalculate legends and schedules of the drawing. | Update legend |
| Footer | Messages of the palette. | Notes |
A clash check and the IFC export are not in the palette: checking is done in the piping and duct plug-ins, export on the ribbon (see IFC and clash check). In the shortcut menu of the drawing, LuaCAD › Openings opens the palette.
All keys at the cursor
The same key means the same thing in every plug-in. Which one currently applies is shown by the action bar; Shift and Ctrl are never assigned at the cursor (they belong to the CAD).
| Key | Meaning for openings |
|---|---|
| Space | show the base points (without and with clearance), a click takes one; while rotating with the mouse: 45° increment on/off |
| A | Enter distance dialog box: amounts X/Y, base point in the 3 × 3 field, rotation, elevation (display 3D only) |
| R | rotate with the mouse, a click fixes it |
| D | type the rotation angle (degrees) – also while rotating |
| W | pick the angle – always two clicks; the X direction of the opening runs from the first to the second point |
| ← / → | rotate by 45° |
| Enter / Esc | at the cursor: back to the Dimensions dialog box; in a choice (base point, angle): back without a change; when clicking (Change properties, Delete): done |
When picking dimensions and when clicking, Esc = back or finish; in 2D → 3D … Enter ends the selection (without a selection = all), Esc cancels.
The gear menu
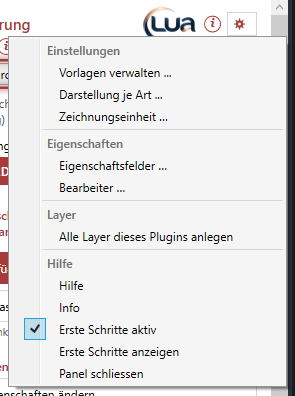
| Entry | Effect |
|---|---|
| Manage templates … | Create, change and sort templates – see Templates. |
| Display by type … | Layer, color, linetype, lineweight and hatch per type – see Display. |
| Drawing units … | In which units new parts are created and fields show lengths – for all plug-ins, see Drawing units. |
| Properties › Property fields … | Which fields openings have (Openings tab) – the same dialog box in all plug-ins, see Property fields of the openings. |
| Properties › Author … | The name in lists, IFC and the clash list – for all plug-ins, empty by default. |
| Layers › Create all layers of this plug-in | Creates the layers of the openings that are missing; existing ones stay as they are. |
| Help | Opens this online help in the browser. |
| Info | Version of LuaCAD and contact. |
| Getting started active | Cards of the page and help at the cursor (picking) for this plug-in on or off. |
| Show getting started | The tip assistant leads step by step through the palette. |
| Close palette | Closes the palette – open it again from the ribbon. |
The LuaCAD settings (for all plug-ins) are on the ribbon › LuaCAD tab › Info – see Getting started. Levels and their elevations are maintained in the project or in a piping plug-in; the Openings plug-in reads them for the elevation from level and for bottom/top in schedule and annotation.
Dialog boxes
Dimensions
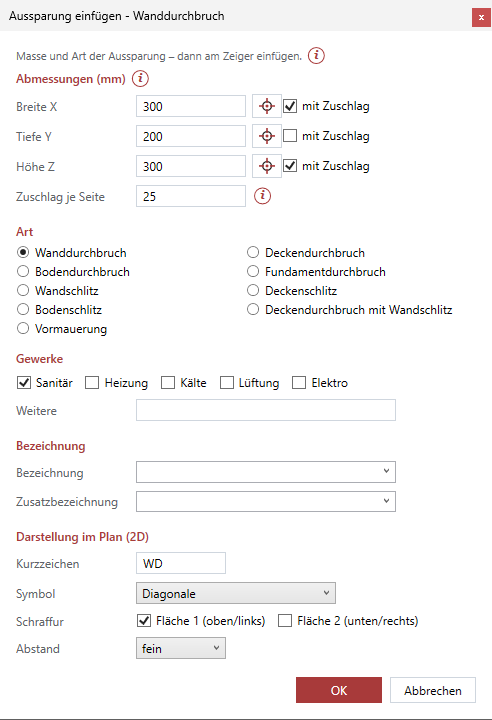
Opens before every insert ("Insert opening - <template>") and with Change properties ("Change properties - <type>"); at the top a line with "i". Areas: Dimensions (with "i" on picking), Clearance per side (with "i"), when changing Fixed point (with "i"), Type, Disciplines with Other, Description and Additional description, for a 2D Display in the plan (2D), for a pair the note on the partner. OK checks the dimensions (greater than 0); Cancel ends inserting or leaves the clicked opening unchanged. Every field: Dimensions dialog box in detail.
Templates
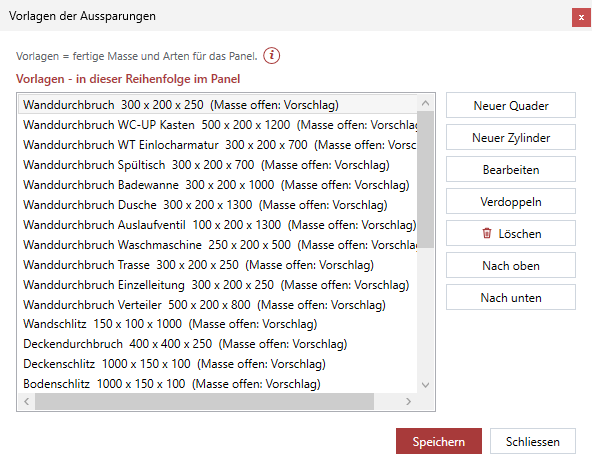
Gear menu › Manage templates …. Title "Opening templates", above it a line with "i". On the left the list "Templates - in this order in the palette", on the right New box, New cylinder, Edit (also double-click), Duplicate, Delete, Move up, Move down. Save writes the whole list and closes; Close asks "Discard changes?" if something changed. See Managing templates.
Template (box or cylinder)
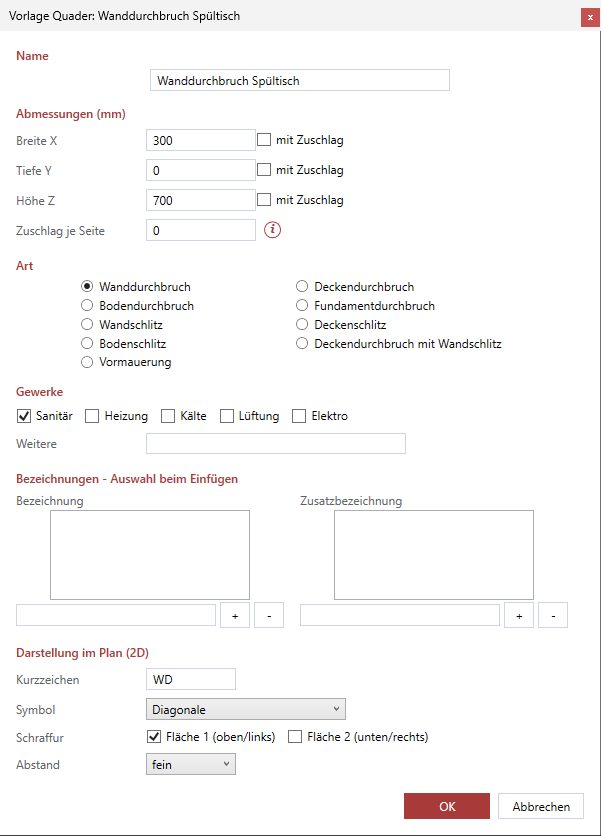
From the templates dialog box with New box, New cylinder or Edit. Title "Box template: <name>" or "Cylinder template: <name>". Fields like the Dimensions dialog box, without crosshair buttons and without fixed point, plus Name and the lists Descriptions - choice when inserting. Every field: Template in detail.
Display
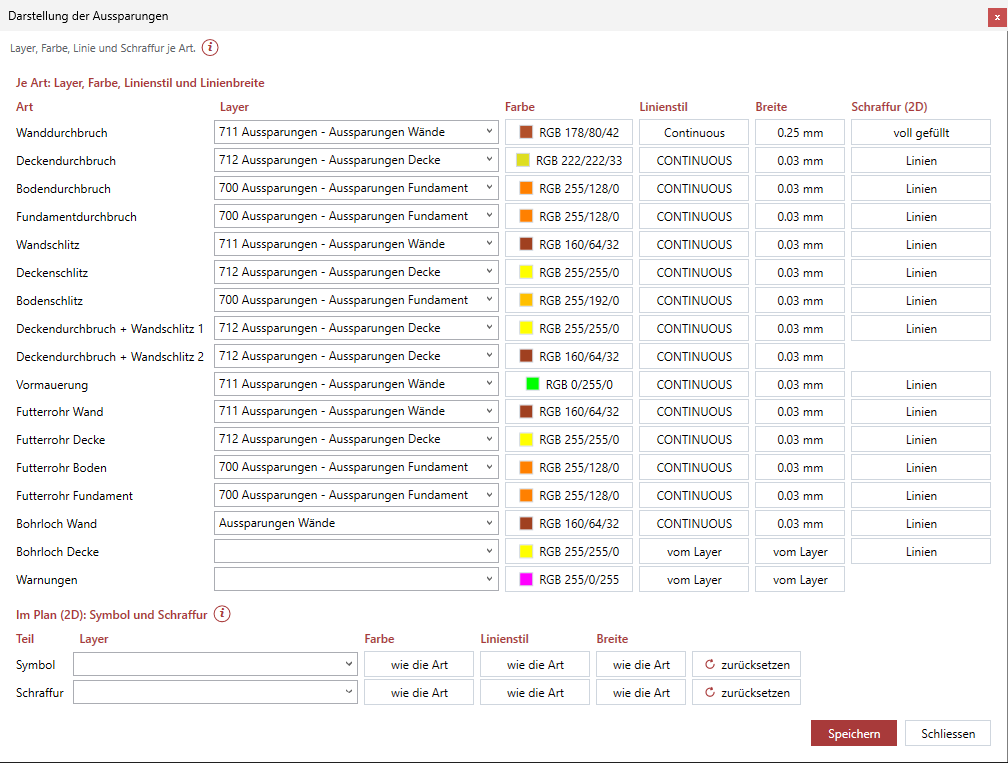
Gear menu › Display by type …. Title "Display of the openings", above it a line with "i". At the top "Per type: layer, color, linetype and lineweight" – one row per type; color, linetype and lineweight open the GstarCAD dialog boxes, Hatch (2D) the Hatch in the plan dialog box. At the bottom "In the plan (2D): symbol and hatch" (with "i"). Save saves and updates the hatch of the 2D openings in the drawing; Close closes without saving. Every setting: Display by type in detail.
Hatch in the plan
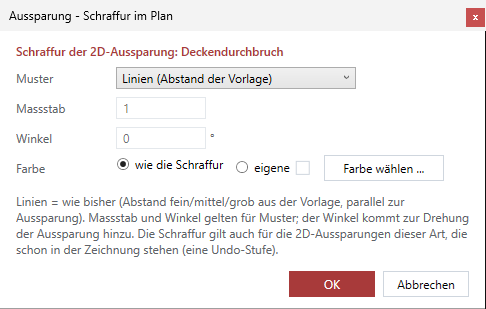
From the display dialog box, button in the column Hatch (2D). Title "Openings - Hatch in the plan", heading "Hatch of the 2D opening: <type>". Pattern, Scale, Angle, Color (as the hatch | own, Choose color …), below it a note. OK applies it to the display dialog box (it is saved there). Every setting: Hatch in detail.
Choose base point
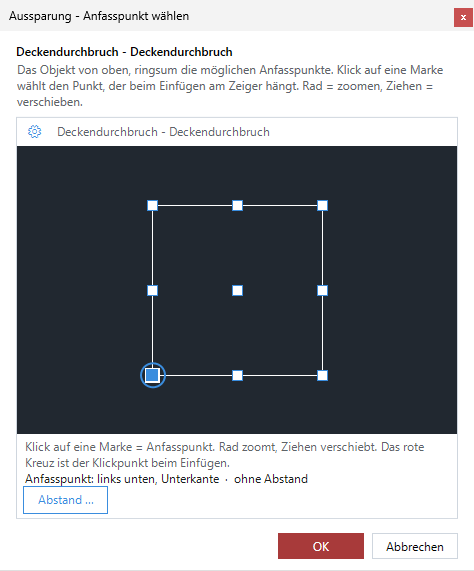
Palette › Base point: choose in the preview. Shows the opening of the selected template (in the selected display) from above, around it the base points. A click on a marker chooses the point; the wheel zooms, dragging pans. Distance … opens "Distance to the base point": X and Y in the axes of the opening, away from the object to the outside (calculating works, empty = 0), No distance removes it. OK applies; Cancel restores base point and distance as before. See Choosing the base point.
Enter distance (key A)
Opens at the cursor with A; at the top an "i". X and Y are amounts in the axes of the opening, 0 and 0 = no distance; the 3 × 3 field shows the base points – a click chooses one, the side of the distance follows it. Plus Rotation about the vertical axis and – only with display 3D – Elevation (absolute, from level or free with the mouse). After OK click the reference point. See Inserting at a distance.
List options
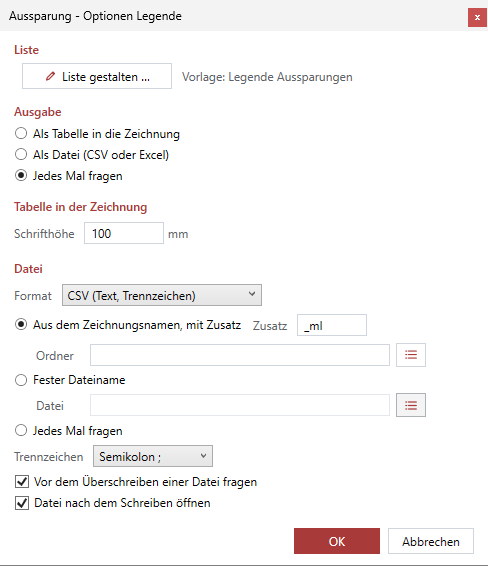
"…" next to Legend or Opening schedule. Title "Openings - Options Legend" or "… Options Opening schedule". Areas List (Design list …, the template), Output, Table in the drawing, File. Every setting: List options in detail.
Annotate - choose template
Palette › Annotate. At the top Automatic (the matching template for each clicked opening), below it the templates in their folders; by default the general ones and those of the openings, Show templates of all plug-ins shows all. Double-click or Enter = annotate. Choice and check box apply for the session. See Annotate.
Drawing units
Gear menu › Drawing units … – the same dialog box in all plug-ins: in which units fields show lengths and new openings go into the drawing (automatic, mm, cm, dm, m). The Openings plug-in calculates and saves internally in mm. Details: Drawing units.
Confirmations
| Confirmation | When | Choice |
|---|---|---|
| Renumber openings | Renumber …; states the number and the order. | Renumber · Cancel |
| Discard changes? | Templates dialog box › Close after changes. | Yes · No |
| Delete template '…'? | Templates dialog box › Delete. | Yes · No |
| <list>: n row(s) – where to? | Opening schedule, as long as the list options say "Ask every time". | Into the drawing · Into a file · Cancel |
| Required fields missing | Before the opening schedule, if a required field is empty. | Output anyway · Show parts |
| Units of the drawing | Inserting into a drawing without definite units – once in the command line. | choose the units |
Every setting in detail
Here is every setting of the Openings plug-in – in the palette, in the dialog boxes, in the gear menu – with its effect, the default and an example. Palette values apply only to openings you insert afterwards and stay remembered (also across a restart). A "-" in the column "Default" means: the value depends on the template or the data. Number fields calculate ("600+400" becomes 1000); dimensions are in the units of the drawing.
Palette
| Setting | What it does | Default | Example |
|---|---|---|---|
| Template | Which template Insert starts with; the line below it states name, type and dimensions. Without a template Insert places a wall opening 400 × 500 × 600. | the last one chosen, otherwise the first in the list | Slab core hole |
| Display | 2D = plan symbol, 3D = solid, 2D and 3D = both as a fixed pair (solid with bottom at elevation 0). Also affects the base points and which side a click hits when a pair lies on top of each other. | 2D | 2D and 3D |
| Property fields of the next opening | The fields with "ask before inserting"; every value goes to every following opening. The description is in the dialog box, not here. | collapsed, empty | Firestop rating EI 90 |
| Base point (button and line) | The point by which the opening hangs at the cursor, and a distance to the click point – per type, separately for 2D and 3D. | 2D: bottom left corner without clearance; 3D: center; no distance | bottom edge, distance 50/0 |
Dimensions dialog box
| Field | What it does | Default | Example |
|---|---|---|---|
| Width X | Extent in X (along the wall, or the first side in the slab), without clearance. | from the template | 300 |
| Depth Y | Extent in Y (wall thickness, or the second side in the slab). | from the template | 200 |
| Height Z | Extent in Z (height of the opening, or slab thickness). | from the template | 300 |
| Radius | Cylinder: the radius without clearance. | from the template | 60 |
| Length / Height | Cylinder: the length of the axis – in the wall "Length" (wall thickness), in slab, floor, foundation "Height". | from the template | 250 |
| Crosshair button next to a dimension | Click two points – the distance goes into the field; width, depth, radius measured in plan. | – | the wall thickness |
| with clearance (per dimension) | The clearance is added to this dimension (width, depth, height, length on both sides, radius once). | from the template | on at width and height |
| Clearance per side | The space per side for the checked dimensions. | from the template | 50 |
| Fixed point (only when changing) | Which point stays put when dimensions change: Center (without base point) or a base point without/with clearance. | the base point at inserting, otherwise center | bottom left corner |
| Type | The type of the opening (only types of the same form). Decides display by type, order, proposed dimensions. | from the template | Wall chase |
| Disciplines: Plumbing, Heating, Cooling, Ventilation, Electrical | Who needs the opening – for schedule, legend, annotation and IFC. | from the template | Plumbing, Heating |
| Other | Another discipline as free text. | from the template | Sprinklers |
| Description | Free text, can be chosen from the list of the template; without an entry LuaCAD proposes the type. | first entry of the template | Riser zone 2 |
| Additional description | A second free text. | first entry of the template | Grid C/4 |
Display in the plan (2D)
In the dialog box (only for a 2D) and in every template.
| Field | What it does | Default | Example |
|---|---|---|---|
| Abbreviation | The abbreviation in schedule, legend and annotation (text, never calculated). | by type (WD, DD, WS, WFR …) | DD/WS |
| Symbol | The mark inside the outline. Rectangular: no symbol, diagonal, cross (both diagonals), angle top left, angle bottom right, diagonal with angles, axis; round: no symbol, axis cross, divided axis cross. | by type | Cross |
| Hatch: hatched, or Area 1 (top/left), Area 2 (bottom/right) | Which areas are hatched; two check boxes for two-part symbols (diagonal, diagonal with angles, divided axis cross). | boxes hatched (except DD/WS), sleeves hatched, core holes not | area 1 on, area 2 off |
| Spacing | The spacing of the hatch lines: fine, normal, coarse (20, 50, 100 mm). Applies as long as the hatch of the type is "Lines". | fine | normal |
Templates and template
| Setting | What it does | Default | Example |
|---|---|---|---|
| Order of the list | The order of the templates in the palette (Move up, Move down). | – | the most frequent first |
| Name | What the template is called in the palette. | New opening / New hole | Core hole 160 |
| Dimensions (Width X, Depth Y, Height Z or Radius, Length / Height) | The dimensions the dialog box starts with; greater than 0. A supplied template may have open dimensions (0) – then the proposal of the type applies. | box 400 × 400 × 400, cylinder R 100, L 400 | 300 × 200 × 300 |
| with clearance, Clearance per side | as in the dialog box | off, 0 | 25 at width and height |
| Type | The type of the template. | Wall opening or Wall core hole | Slab sleeve |
| Disciplines, Other | The disciplines the dialog box starts with. | none | Ventilation |
| Descriptions - choice when inserting (two lists, +, -) | The entries for description and additional description in the dialog box; the first is preselected. | empty | "Riser zone 1; Riser zone 2" |
| Display in the plan (2D) | Abbreviation, symbol, hatch, spacing – see above. | default of the type | – |
Display by type
| Setting | What it does | Default | Example |
|---|---|---|---|
| Rows per type | Wall opening, slab opening, floor opening, foundation opening, wall chase, slab chase, floor chase, slab opening + wall chase 1, furring wall, sleeve wall/slab/floor/foundation, core hole wall/slab. | – | – |
| Rows "slab opening + wall chase 2" and "Warnings" | Are listed in the table, but the openings of this plug-in currently do not use them. | – | – |
| Layer | The layer of the openings of this type (list of the drawing or type it); empty = LuaCAD_BAU_Aussparung or …_2D. | empty | Openings plumbing |
| Color | Color of the lines; GstarCAD color dialog box (ByLayer, ByBlock, color index, true color, color book). | ByLayer | red |
| Linetype | Linetype; GstarCAD linetype dialog box. | ByLayer | dashed |
| Lineweight | Lineweight; GstarCAD lineweight dialog box. | ByLayer | 0.35 mm |
| Hatch (2D) | The hatch of the 2D of this type – see Hatch. | Lines | solid fill |
| Symbol (bottom) | Own layer, color, linetype, lineweight for the symbol of all 2D openings; "as the type" = from the outline. | as the type | – |
| Hatch (bottom) | the same for the hatch of all 2D openings. | as the type | own layer for lighter printing |
| reset | Put the Symbol or Hatch row back to "as the type". | – | – |
Hatch in the plan
| Setting | What it does | Default | Example |
|---|---|---|---|
| Pattern | Lines (spacing of the template) = parallel to the opening, spacing fine/normal/coarse of the display in the plan; solid fill; or a pattern of the GstarCAD pattern file (metric drawing gcadiso.pat, otherwise gcad.pat). | Lines | ANSI31 |
| Scale | Size of the pattern (patterns only, greater than 0). | 1 | 10 |
| Angle | Angle of the pattern in degrees (patterns only); added to the rotation of the opening. | 0 | 45 |
| Color | as the hatch (Hatch row at the bottom of the display dialog box, otherwise the type) or own with Choose color … – also for lines. | as the hatch | gray 8 |
Base point and distance
| Setting | What it does | Default | Example |
|---|---|---|---|
| Base point (preview, Space bar) | The point at the cursor; 2D: nine points on the net dimensions, with clearance eight more; 3D: corners, edge midpoints, face centers with and without clearance. Remembered per type and per 2D/3D. | 2D bottom left corner without clearance, 3D center | bottom right corner |
| Distance to the base point (preview) | X/Y from the base point to the click point, in the axes of the opening. Applies to all further inserts. | no distance | X 50, Y 0 |
| Enter distance (key A): X, Y | Amounts to the reference point for this command. | 0 / 0 | 300 / 0 |
| 3 × 3 field | The base point on whose side the distance applies. | the valid one | bottom left |
| Rotation about the vertical axis | Angle in degrees. | the one at the cursor | 90 |
| Elevation (3D only) | Absolute, from level or free with the mouse. | free (from the click) | from level, FF, 1000 |
List options
Separately for legend and opening schedule.
| Setting | What it does | Default | Example |
|---|---|---|---|
| Design list … | Columns, sorting, totals, filter, Excel template in the list layout dialog box. | default template "Opening legend" or "Opening schedule" | own template with an Approval column |
| Output | As a table in the drawing · As a file (CSV or Excel) · Ask every time. The legend always goes into the drawing. | Ask every time | As a file |
| Text height | Text height of the table in the units of the drawing. | 100 mm | 150 mm |
| Format | CSV (text, separator) or Excel workbook (.xlsx). | CSV | Excel |
| File name | From the drawing name with suffix (and folder; empty = next to the drawing) · Fixed file name · Ask every time. | from the drawing name | – |
| Suffix | After the drawing name. | "_sl" (opening schedule), "_ml" (legend) | "_openings" |
| Folder, File | Folder or fixed path, can be chosen with the button. | empty | D:\Projekte\Bau\Listen |
| Separator | Separator of the CSV file: semicolon, comma, tab. | Semicolon | Tab |
| Ask before overwriting a file | Confirmation if the file already exists. | on | off |
| Open the file after writing | Open the file afterwards. | on | off |
Property fields of the openings
Gear menu › Properties › Property fields …, Openings tab (standard fields grayed out, can only be hidden; own fields 50 to 99).
| Field | What it does | Default | Example |
|---|---|---|---|
| Number | The sequence number; renumbered for a copy. | the next free one | 12 |
| Approval | State of the opening: requested, approved, completed. | requested | approved |
| Firestop rating | Fire resistance of the closure: –, EI 30, EI 60, EI 90; asked before inserting (palette). | empty | EI 90 |
| Description, Additional description | The common fields of all plug-ins; the dialog box writes them. | – | – |
| own fields | What your office needs, with properties such as "ask before inserting", "offer in lists", "required field". | – | construction phase |
The properties of a field are explained in Property fields in the Block Library – the same dialog box.
Gear menu › further entries
| Entry | What it controls |
|---|---|
| Drawing units … | Units of the fields and of new parts – for all plug-ins, see Drawing units. |
| Author … | The name in lists, IFC and the clash list – for all plug-ins, empty by default. |
| Layers › Create all layers of this plug-in | Creates missing layers of the openings (for example for an office template); existing ones stay as they are. |
| Getting started active | Cards of the page and help at the cursor for this plug-in on or off. |
Typical notes and errors
| Message (command line, dialog box or palette) | Meaning | What to do |
|---|---|---|
| No templates yet - create them under 'Manage templates'. … | The template list is empty; Insert places a wall opening. | Gear menu › Manage templates … › New box. |
| (dimensions open: proposal) | The template leaves dimensions open; the dialog box proposes those of the type. | Enter the dimensions in the dialog box. |
| The dimensions must be numbers greater than 0. | A dimension is missing or 0. | Enter the dimension. |
| The template needs a name. | Template without a name. | Type a name. |
| Both points coincide in plan - please click two different points. | When picking, the same point in plan twice. | Click two different points. |
| Cancelled - nothing was inserted. | Inserting ended without an opening being placed. | – |
| n opening(s) inserted. | End of inserting. | – |
| There is no opening there - please click an opening, or Enter to finish. | Missed click. | Click exactly on the opening. |
| Linked opening updated: … | The partner of a pair has followed. | – |
| n linked opening(s) deleted along (2D and 3D are a pair). | When deleting, the partner went along. | U brings both back. |
| Opening changed with the grip: … | A 2D was changed with a grip or STRETCH. | – |
| Change dimensions with "Change properties". | A 3D solid was stretched or scaled and jumps back. | Change properties. |
| No 2D opening without 3D found - nothing converted. | 2D → 3D without a matching 2D. | – |
| Among the n selected objects there is no 2D opening - nothing converted. | Other objects or only 3D were selected. | Select 2D openings. |
| n 3D opening(s) created from 2D (bottom at elevation 0), m already had a 3D. | Result of 2D → 3D. | Set the elevation with MOVE. |
| Display saved - … | Display by type saved. | – |
| n 2D opening(s) of the drawing show the new hatch. | The hatch was updated. | – |
| No opening in this drawing - nothing numbered. | Renumber without an opening. | – |
| n opening(s) renumbered (1 to n). | Result of Renumber. | Update legend. |
| No legend of the openings in the drawing - insert a "Legend" first. | Update legend without a table. | Insert a legend. |
| no openings in the drawing | Legend or schedule without an opening. | – |
| The list could not be calculated - details are in the log. | An error in legend or schedule. | Try again; otherwise send the log to support. |
| Note on the drawing units (units and factor) | The drawing is not in mm. | Nothing – the opening goes in at the matching scale. |
| Layer "…" is locked - part not changed. | The opening is on a locked layer. | Unlock the layer. |
| That did not work - details are in the log. | An error in the command. | Try again; otherwise send the log to support. |