
Templates and display
Managing templates
Goal: set up the list of templates in the palette for your usual openings.
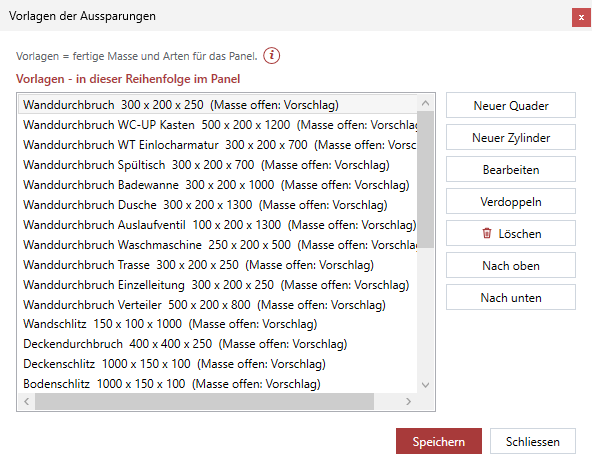
- Gear menu › Manage templates …. The list shows every template with name, type and dimensions – in the order in which they appear in the palette.
- New box or New cylinder creates a template ("New opening" or "New hole") and opens it for editing right away.
- Edit (or double-click) opens the selected template. Duplicate creates a copy right below it ("… (Copy)") – handy for a variant with other dimensions.
- Delete removes the selected template after a confirmation. Move up and Move down move it in the list.
- Save applies everything and closes; the palette shows the new list ("Templates saved."). Close discards the changes – after the confirmation "Discard changes?".
The templates apply to all drawings and are saved in your settings, not in the drawing. LuaCAD creates a template "Wall opening" (dimensions open) once; if you delete it, it does not come back. What a template contains: Template.
Editing a template
Goal: set name, dimensions, type, disciplines, the description lists and the look in the plan of a template.
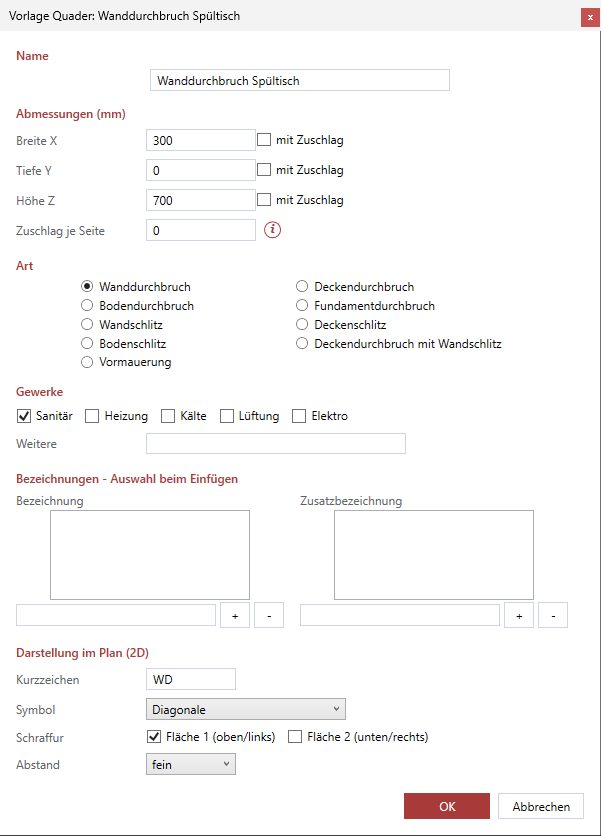
- Name: what the template is called in the palette – text, never calculated ("100-50" stays).
- Dimensions (units of the drawing): for a box Width X, Depth Y, Height Z, for a cylinder Radius and Length / Height; per dimension the check box with clearance. Clearance per side below.
- Type: one of the types of the form.
- Disciplines: Plumbing, Heating, Cooling, Ventilation, Electrical, plus Other as free text.
- Descriptions - choice when inserting: one list each for Description and Additional description. Type text in the field below, + adds it, - removes the selected entry. The first entry is preset when inserting, the others can be chosen in the dialog box.
- Display in the plan (2D): abbreviation, symbol, hatch and spacing of the hatch lines. Without own entries the default of the type is shown here.
- OK applies it to the list (it is saved only with Save in the templates dialog box). Without a name the dialog box says "The template needs a name."; dimensions must be greater than 0.
Display by type
Goal: set on which layer and in which color, linetype and lineweight each type of opening is drawn – and how the 2D is hatched in the plan.
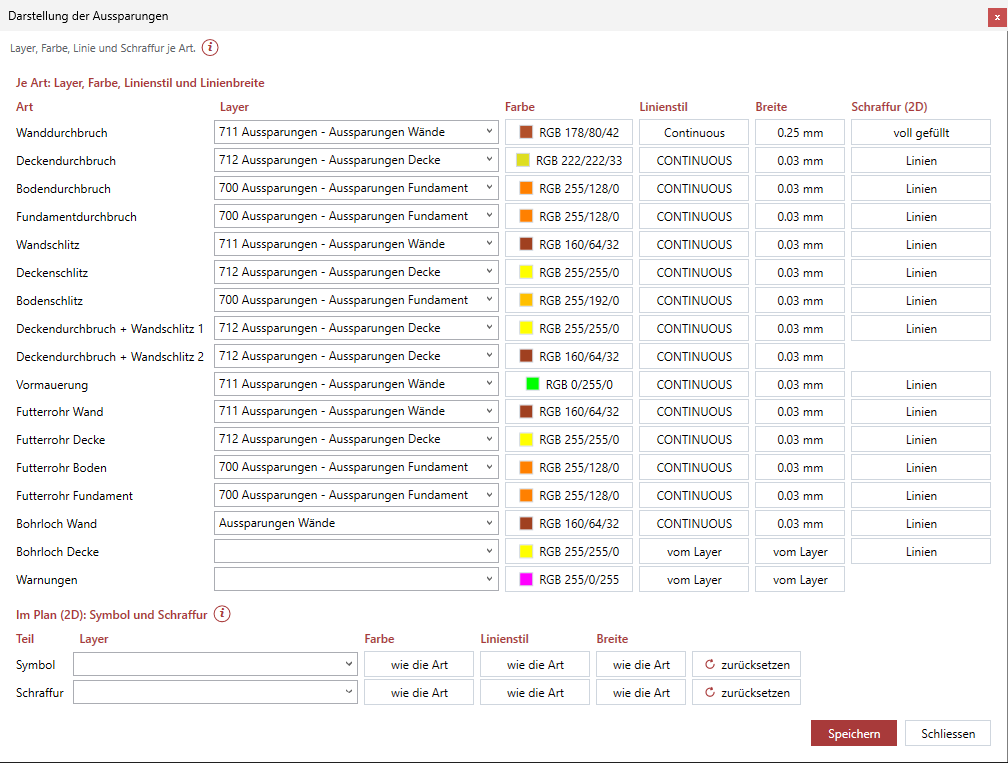
- Gear menu › Display by type ….
- One row per type: Layer (choose from the list of the drawing or type it; empty = the layer of the openings), Color, Linetype and Lineweight – a click opens the GstarCAD dialog box for it. Hatch (2D) opens Hatch in the plan.
- At the bottom In the plan (2D): symbol and hatch: for all types a look of their own for the symbol or the hatch. What is empty or "as the type" comes from the outline of the type. reset puts the row back to "as the type".
- Save. The command line says "Display saved …"; the hatch applies immediately also to the 2D openings in the drawing ("n 2D opening(s) of the drawing show the new hatch."). Close closes without saving.
Layer, color, linetype and lineweight apply to openings you insert afterwards or change with Change properties. The existing 2D openings also take over the hatch – in one undo step. By default nothing is chosen: everything comes from the layer, the hatch is lines.
Hatch in the plan
Goal: instead of lines, fill the 2D openings of a type solidly or with a pattern – in a color of their own if you like.
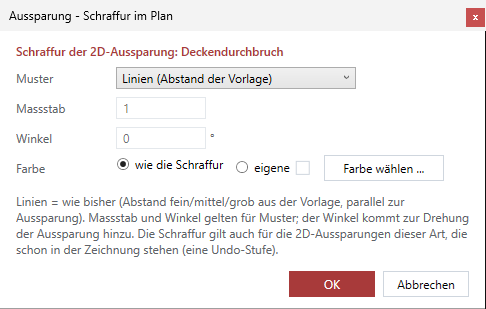
- In the display by type dialog box click the button under Hatch (2D) in the row of the type (it shows what applies – "Lines", "solid fill", "ANSI31 ×10 45°" …).
- Pattern: Lines (spacing of the template) – as by default, parallel to the opening, spacing fine, normal or coarse from the template –, solid fill or a pattern from the GstarCAD pattern file.
- Scale and Angle apply to patterns only; the angle is added to the rotation of the opening. With "solid fill" and "Lines" they are grayed out.
- Color: as the hatch (the look of the Hatch row at the bottom of the dialog box, otherwise of the type) or own – Choose color … opens the GstarCAD color dialog box.
- OK – it is saved with Save in the display by type dialog box.
A 2D has the hatch only in the areas checked in its display in the plan ("hatched" or area 1 and 2). Without a check the area stays empty, whatever pattern is chosen.
Adjusting layers
Goal: name and set the layers of the openings according to the rules of your office.
- Without your own choice 3D openings are on
LuaCAD_BAU_Aussparung, 2D openings onLuaCAD_BAU_Aussparung_2D, their annotations onLuaCAD_BAU_Beschriftung Aussparung. LuaCAD creates them when the palette opens and when needed. - Change name, color, linetype, lineweight, plotting and on/off in the Layer Manager of GstarCAD. The assignment stays – new openings go to the renamed layer. A deleted layer is created again the next time it is needed.
- A different layer per type is chosen under Display by type.
- Gear menu › Layers › Create all layers of this plug-in creates them all at once, for example for an office template; existing ones stay as they are.
See also Layers.