
The library
Finding blocks
Goal: find the right block in the library.
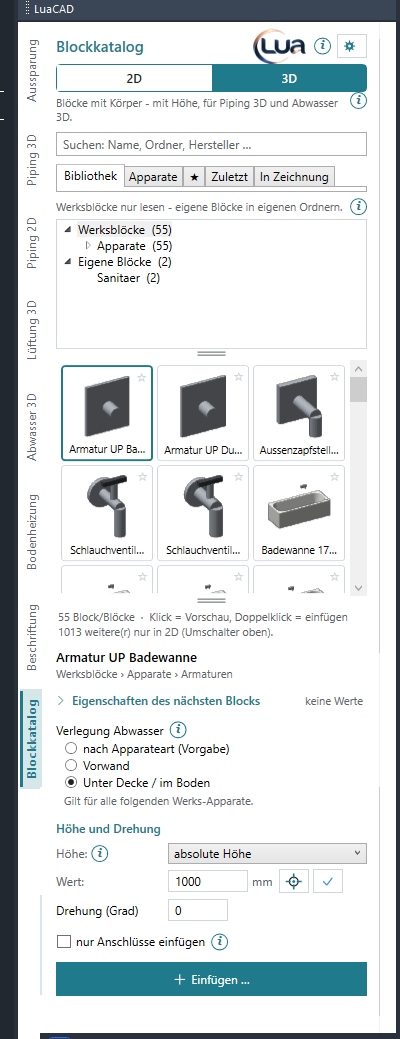
- Choose the Library tab. The folder tree shows the standard blocks at the top and your own folders below. The number after a folder counts the blocks in it and in its subfolders – only those that match the 2D | 3D switch. Folders without a matching block are hidden.
- Click a folder – the tiles show all its blocks and those of its subfolders. The root shows everything below it.
- Or search at the top: type parts of the name or the folder, for example "wash 60". Every word must occur; upper/lower case and the spelling of umlauts do not matter. The search applies on every page, also to favorites, recent and the current drawing.
- Click a tile – the block is selected (accent frame) and appears in the preview window. A double-click inserts it right away. The tooltip of a tile names the block and its origin.
Options
- Tree and tiles can be made taller or shorter with the bar below them; a double-click on the bar resets the default. The heights are remembered.
- At most 150 tiles are shown – beyond that the line below the tiles says "150 of n blocks – refine the search".
- Below the tiles is how many blocks there are, and how many exist only in the other mode ("3 more only in 2D (switch at the top)").
- A tile without an embedded preview gets a line picture of the DWG; until it is drawn, two letters of the name are shown.
- A folder that cannot be read is shown in red in the tree; its tooltip names the reason.
Preview
Goal: look at a block from all sides before inserting and choose the base point.
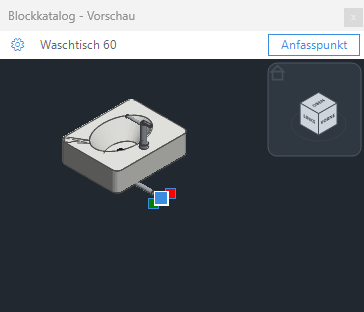
- Click a tile – the preview window next to the palette shows the block. In 3D with solid and connectors, in 2D only its 2D parts from above, as it looks when inserted.
- Rotate in the window, choose the display and the view direction.
- Choose a base point in the window – it hangs at the cursor the next time this block is inserted. A clicked connector too.
- For a fixture with several connector sets the preview shows the connectors of the set chosen under "Connectors".
The DWG is only read for this – the drawing stays untouched, no undo step. Closed? Gear menu › Preview window › Show brings the window back; Hide turns it off.
Favorites and recent
Goal: find frequently used blocks again quickly.
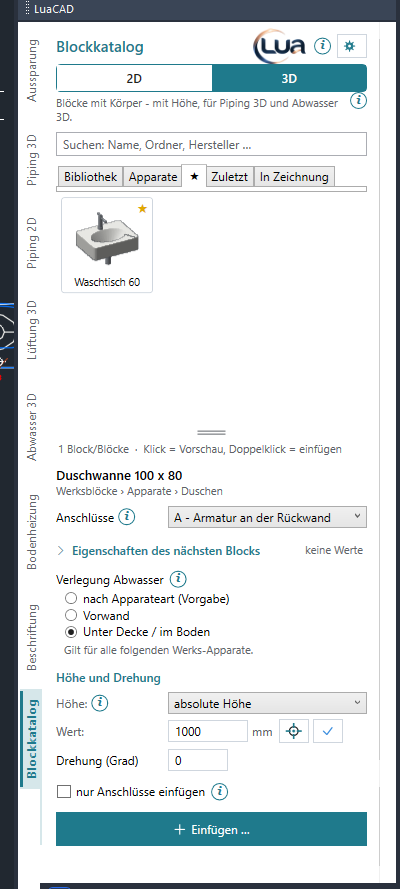
- On a tile click the star at the top right – the block is a favorite (star filled). Or right-click the tile › Add to favorites.
- The tab with the star shows all favorites from all folders.
- Clicking the star again (or right-click › Remove from favorites) takes it out again.
- The Recent tab shows the blocks inserted last, the newest first, at most 20.
Favorites and recent follow the 2D | 3D switch and the search. If a folder is renamed, they move along; a deleted block stays remembered but is no longer shown.
Adding your own folders
Goal: bring your own block DWGs (office, manufacturer, project) into the library.
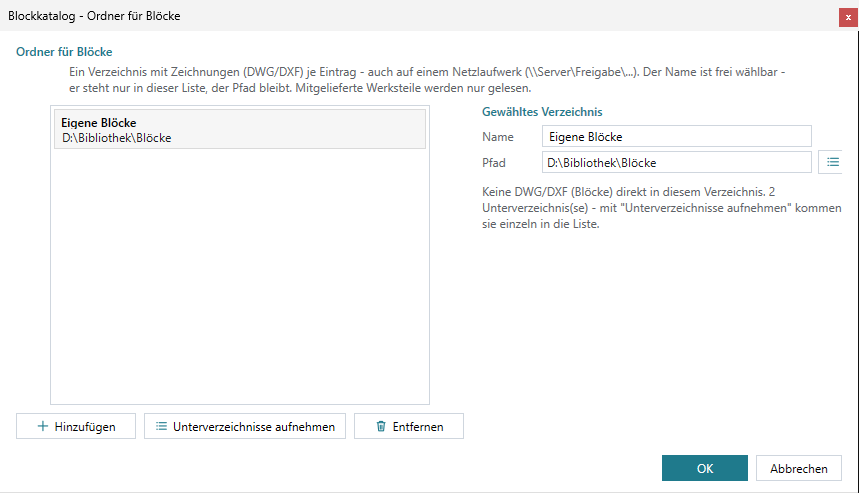
- Gear menu › Folders ….
- Add – choose a folder with DWG or DXF files, also on a network drive (UNC path such as
\\Server\Share\Blocks). - On the right give it a name – it appears in the folder tree, the path stays. Below is how many DWG/DXF files and subfolders it contains.
- OK – the palette reads again, the folder appears in the tree below the standard blocks.
Options
- Remove (or Del) takes an entry out of the list – the files stay on disk.
- Add subfolders makes each subfolder an entry of its own (at most 100). In the Block Library this is rarely needed: the tree shows the subfolders anyway.
- The selected (highlighted) entry is also the place where the block wizard wants to save first.
- By default the folder Custom blocks is in the list (
AppData\Roaming\LuaCAD\Bibliothek\Bloecke). The standard blocks are always at the top of the tree and do not belong in this list.
Every DWG and DXF of a folder is a block, subfolders up to eight levels deep are its categories. Folders and files whose name starts with "_" or ".", and hidden files, are not shown. Without any entry the palette shows the hint "No folder set up yet – gear menu › Folders."
Creating, renaming, deleting folders
Goal: organize the folders of your own library right in the palette.
- Right-click a folder in the tree to open the shortcut menu – the folder is selected at the same time.
- New folder … – enter a name; the subfolder is created in the selected folder and is selected afterwards.
- Rename … – enter the new name. Favorites, recent, the selected block and scale factors move along; blocks already inserted stay in their drawings as they are.
- Delete … – the confirmation states how many DWGs and subfolders it contains; To the recycle bin moves the folder to the recycle bin (restorable in Explorer).
- Show in Explorer opens the folder in Windows Explorer.
These entries are unavailable (gray, the tooltip names the reason) for the standard blocks (read-only) and, for rename and delete, for a root – add and remove roots in gear menu › Folders. A name must not contain characters such as \ / : * ? " < > |, must not end with a period and must not start with "_" or "." (the folder would be invisible). If something does not work (for example because a DWG from it is still open), the reason appears at the bottom of the palette.
Scale factor of a folder
Goal: insert the blocks of a folder at a different scale – for example plan symbols drawn for 1:50.
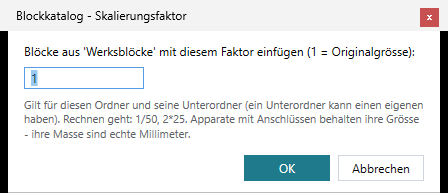
- Right-click the folder in the tree › Scale factor … – or, on the Library page with the folder selected, gear menu › Scale factor for folder '…' ….
- Enter the factor: 1 = original size; you may calculate ("1/50", "2*25"). A number greater than 0 is allowed (0.0001 to 100 000).
- OK – the tree shows the factor after the folder ("×50"), the selected block shows "· Factor 50". When inserting, the command line says "Scale factor 50 (folder)."
- Factor 1 removes it again.
The factor applies to the folder and all subfolders that have none of their own. Fixtures with connectors keep their size – their dimensions and connector elevations are real millimeters; the command line says so. The factor is stored in your settings, not in the folder – standard blocks can carry one too. Preview, base points and distance at the cursor apply at the new scale.
Shortcut menu of a tile
Goal: insert, remember, open or locate a block right at its tile.
Right-click a tile:
| Entry | Effect |
|---|---|
| Insert | select the block and insert it right away |
| Add to favorites / Remove from favorites | like the star |
| Open DWG (edit, define connectors) | open the DWG of the block in GstarCAD – see Editing the DWG |
| Show in Explorer | open the folder in Explorer with the DWG highlighted |
Reloading the library
Goal: bring new, changed or deleted DWGs into the palette that were added in Explorer (or by colleagues on the network).
- Gear menu › Reload library.
- The palette reads all folders again; expanded folders and the selected block stay.
A change in gear menu › Folders and the block wizard read again by themselves. Whether a block can show 2D, 3D or both is determined by the palette for new blocks in idle time – until then it appears in both modes.