
Output
Lists and annotations read the same data as the drawing: a loop counts once (supply and return together), its length is the length in the area plus the leaders to the manifold.
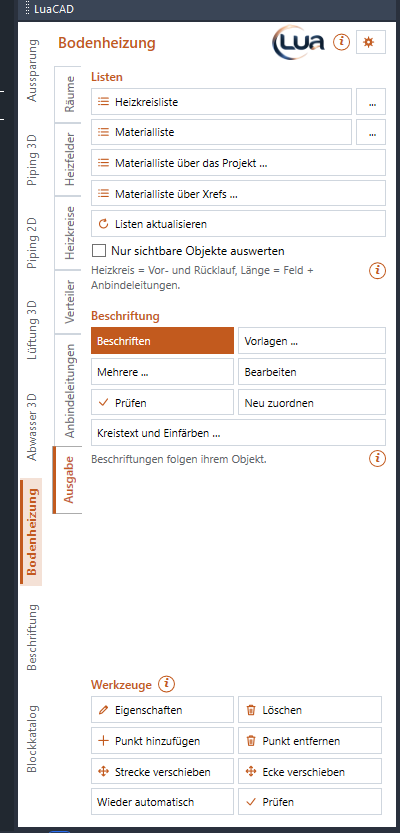
Loop schedule
Goal: one row per loop with room, area, spacing and lengths – grouped per manifold.
- Click Loop schedule.
- Depending on the list options click the corner of the table in the drawing (the table hangs at the cursor) or choose a file name – by default the plug-in asks each time where to.
Default columns: No. · Room · Area [m²] (the loop's share of the area) · Spacing [mm] · Pipe · Pattern · Area length [m] · Leaders [m] · Total [m]. Sorted by manifold and outlet; one group per manifold with subtotal (from two manifolds on), the total at the end. Across several drawings the column Drawing is added.
Bill of materials
Goal: the material for ordering and quoting.

- Click Bill of materials.
- As with the loop schedule: into the drawing or as a file.
Default rows (columns Description · Quantity · Length [m] · Delivery):
| Row | What is counted |
|---|---|
| Heating pipe per size | Area length + leaders of all loops. Delivery: the coils (120 m, 240 m or 600 m) planned so that no loop needs a joint – the coil length with the smallest remainder. |
| Manifolds per number of outlets | per size ("manifold with 6 outlets, with cabinet") with quantity |
| Edge insulation strip | the perimeter of the heated rooms |
Pipes are listed with their length, not with the number of pieces.
List options
Goal: set where a list goes and what it looks like.
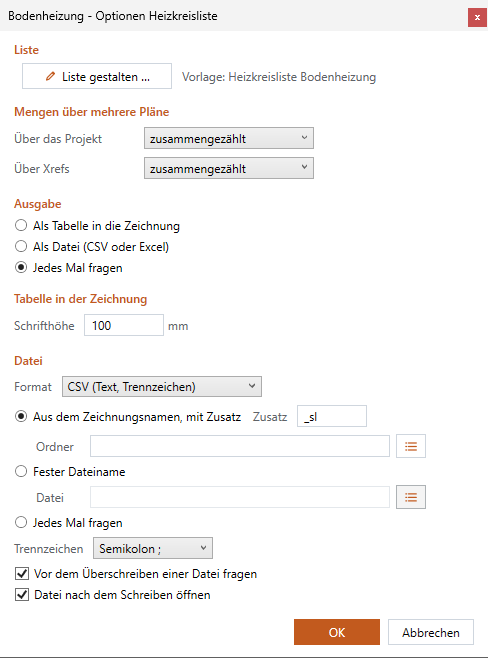
- Click "..." next to Loop schedule or Bill of materials – each list has its own options.
- Design list … opens the list layout dialog box: columns, sorting, totals, filters and an Excel template, with preview. The selected template is shown next to it.
- Quantities across the project / across xrefs: together, per drawing or per level.
- Output: As a table in the drawing · As a file (CSV or Excel) · Ask each time (default).
- Table in the drawing: the text height (default 100 mm).
- File: format CSV or Excel; file name from the drawing name with suffix (empty folder = next to the drawing), fixed or ask each time; separator of the CSV file; ask before overwriting; open the file after writing.
- OK – applies to all drawings.
Every setting: List options.
Across several drawings
Goal: a bill of materials across several drawings – the levels of a project or the xrefs of the drawing.
- Click Bill of materials across the project … or Bill of materials across xrefs ….
- Check the drawings in the dialog box. The drawings are only read, never opened.
- Output as usual; whether quantities are shown together, per drawing or per level is set in the list options.
How a project is set up: Creating a project.
Update lists and visible objects only
Goal: bring inserted tables up to date.
- Select tables beforehand (or select nothing = all).
- Click Update lists – the tables are recalculated with the current state; they stay where they are.
With the check box Evaluate visible objects only (off by default) objects on layers that are turned off or frozen are left out of every list.
Annotate
Goal: annotate a room, a loop or a manifold with a text from a template that follows the object.
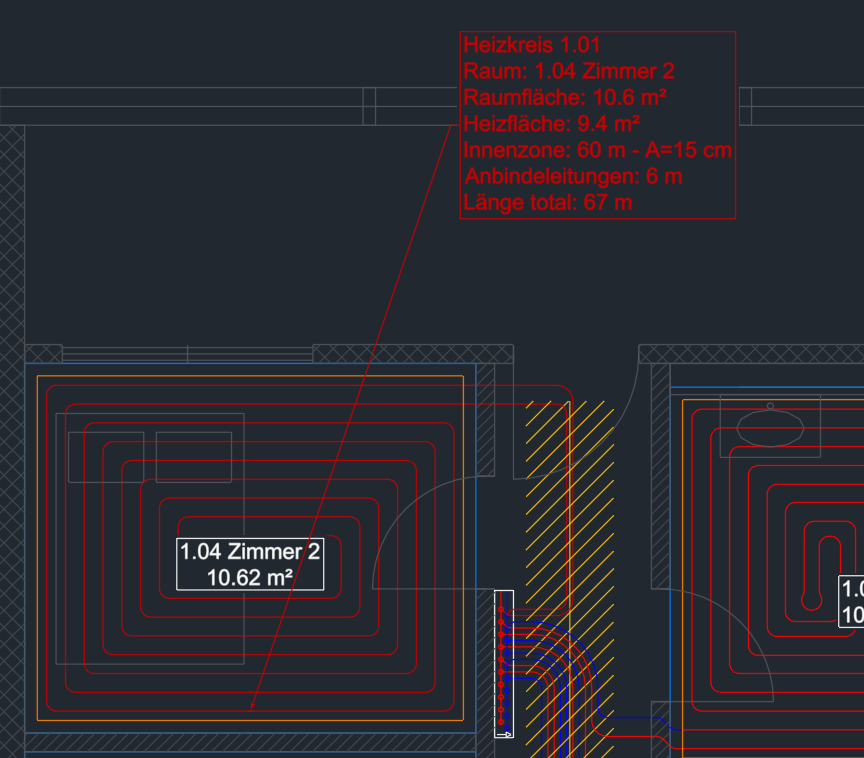
Steps
- Click Annotate.
- Click a room, a loop (on the pipe) or a manifold. The plug-in chooses the template by the type of the object ("Automatic"); Template at the cursor switches it.
- Place the text.
Default templates (folder Heating › Floor Heating):
| Template | Content |
|---|---|
| Room (Floor Heating) | number and name, area – framed, without leader in the room (the room tag) |
| Room standard (Floor Heating) | room name, room number, room temperature – framed |
| Loop (Floor Heating) | loop number, room, room and heated area, perimeter and inner zone (length – spacing), leaders, total length – framed with leader (the loop text) |
| Loop standard (Floor Heating) | number, room, spacing, heated area, area length, leader, total |
| Manifold (Floor Heating) | name, number of outlets and how many are used |
| Manifold standard (Floor Heating) | name, used loops, outlets |
The annotation is attached to its object: if a loop is rebuilt (room changed, spacing changed), it finds it again through room, area and loop; its text follows the number and the lengths. A line without a value is dropped automatically. Templates ... opens the template editor: content, shape and look of the annotations, fields such as {Raumbezeichnung}, {Nummer}, {Laenge}, {Abgaenge}.
Annotate several
Goal: one template on many objects at once – for example all loops of a manifold.
- Click Several ....
- Choose template and scope in the dialog box: the loops of a manifold, a selection or the whole drawing.
- OK – the plug-in places the texts where they fit, and never over heating pipes.
Edit, check and reassign annotations
| Button | Effect |
|---|---|
| Edit | Click an annotation (or select it beforehand) – template, additional text, shape, layer. Also by double-click. "Back to template" is there too. |
| Check | Update all annotations and show those without an object. |
| Reassign | Click an annotation, then the object it belongs to. |
A placed annotation follows the object, never the template: if you change the template later, placed annotations stay as they are.
Loop text and coloring
Goal: set what the text of a loop shows – and whether loops are colored when annotated.
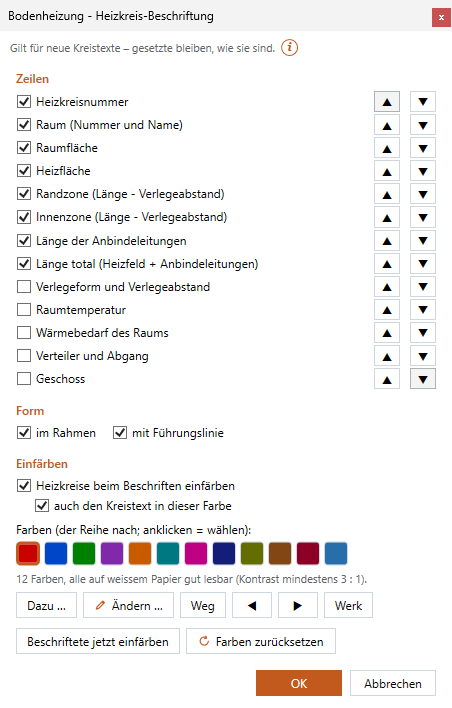
Steps
- Click Loop text and coloring … (or gear menu › Loop annotation …).
- Lines: check what appears in the loop text; the arrows ▲ ▼ change the order. A line without a value is dropped automatically.
- Shape: framed, with leader line (without it only the text stands – it stays linked to the loop).
- Coloring: Color loops when annotating – every annotated loop gets its own color, supply and return and both leaders; neighboring loops on the same manifold never get the same one. Loop text in this color too.
- Colors: the palette in order; click = select. Add … and Change … open the GstarCAD color dialog box, Remove takes the selected one out, ◀ ▶ move it, Default = the twelve default colors. A color that reads poorly on white paper is named in the note below.
- OK – applies to new loop texts. Or right away Color annotated loops now (all loops of the drawing already annotated) or Reset colors (all loops back to their display).
Every setting: Loop annotation.