
Loops
A loop is created in a heated area: you click the area and choose the connector point – the plug-in lays out connector, turn and bends itself. When the room or the area changes, the loop is re-placed with its values.
Values for the next loop
Goal: set how the next loop is laid – before you place it.
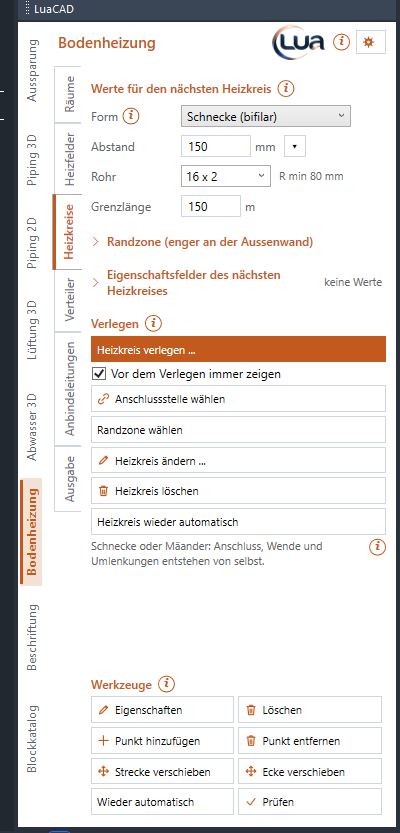
| Field | Effect |
|---|---|
| Pattern | Counterflow (bifilar) (default) or Serpentine (single) – see Counterflow and serpentine. |
| Spacing | The on-center spacing of the pipes (default 150 mm, allowed 30 to 1000 mm). ▾ next to it offers 50 to 300 mm in steps of 50; any other value can be typed. |
| Pipe | Outside diameter x wall thickness in mm (default 16 x 2; the list offers 14 x 2, 16 x 2, 17 x 2, 20 x 2, others can be typed). Next to it is the minimum bend radius R min = 5 × outside diameter (16 x 2 → 80 mm); every bend keeps it. |
| Maximum loop length | The longest a loop may become, in m (default 100 m, allowed 20 to 200 m) – see Maximum loop length. |
| Perimeter zone (closer at the exterior wall) | Collapsed; expanded it shows the check box Choose perimeter zone when placing (off by default), the width of the zone (default 1000 mm) and its spacing (default half the on-center spacing, 75 mm). Which walls belong to the zone you choose when placing or with Choose perimeter zone. |
| Property fields of the next loop | Values of the property fields (description, system …) that every newly placed loop gets – only those it does not yet carry. See Property fields before inserting. |
The same values appear in the Place loop dialog box that comes before every placement; what you change there is shown here afterwards.
Place loop
Goal: lay a loop into a heated area.
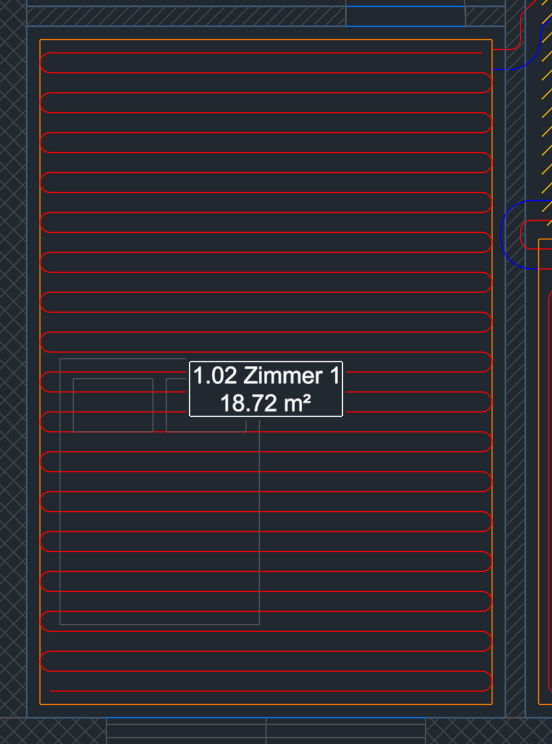
Steps
- Click Place loop .... With the check box Always show before placing (on by default) the Place loop dialog box with pattern, spacing, pipe, maximum loop length and perimeter zone comes first – OK.
- Before the first click the insertion help shows the procedure with a picture.
- 1 of 2: move the cursor over a heated area – the loop is already visible – and click (1).
- 2 of 2: click the connector point at the edge of the area (2) – supply and return leave there. Enter = automatic (on the side toward the manifold, without a manifold toward the center of the building). Esc = back to 1 of 2.
- Only with Choose perimeter zone when placing: 3 of 3 – click the walls of the perimeter zone (each click on/off), Enter = finish.
- The loop is created; the command line shows room, pattern, number of loops, length in the area and spacing. Next area right away; Enter finishes.
If there are manifolds, the new loop gets a free outlet of the nearest manifold right away – existing assignments stay.
Options
| What | Effect |
|---|---|
| Esc at the cursor | With the dialog box first: back to the dialog box with your values; Cancel there ends. |
| Check box "Always show before placing" | Off: the loop hangs at the cursor right away with the palette values. Switch it back on in the palette. |
Maximum loop length
Goal: understand what happens when a loop would become too long.
If a loop in the area would be longer than the maximum loop length, the plug-in divides the area into loops of about equal length ("A loop would be longer than the maximum loop length 100 m – the area is divided into 2 loops of about equal length."). If the room has only one area, every loop gets its own heated area – with a joint between them. The leaders are added only afterwards: if the loop becomes too long with them, there is only a warning in the command line.
Choose connector point
Goal: set where supply and return of a placed loop leave the area.
Steps
- Click Choose connector point. Before the first click the insertion help shows the procedure.
- 1 of 2: click the loop or its heated area.
- 2 of 2: click the spot at the edge of the area – the loop is shown anew right away, the previous loops of the area are hidden meanwhile. Enter = automatic again. Esc = back, nothing changed.
- The loop is re-placed. Next one right away; Enter finishes.
The chosen spot stays even when the room changes. To release it: Enter in step 3, or the check box "Connector point automatic" in the Change loop dialog box.
Choose perimeter zone
Goal: choose the walls along which the pipes of a loop lie closer – usually exterior wall and windows.
Steps
- Click Choose perimeter zone.
- Click the loop.
- Click the walls (1) – each click on or off; the command line says "Perimeter zone on – at 2 wall(s)". The loop is already shown with the zone at the cursor.
- Enter = finish, the loop is re-placed.
Width and spacing of the zone come from the palette (perimeter zone section) as long as the loop has no perimeter zone yet; after that you change them with Change loop.
Change loop
Goal: change pattern, spacing, pipe, number or perimeter zone of a placed loop.
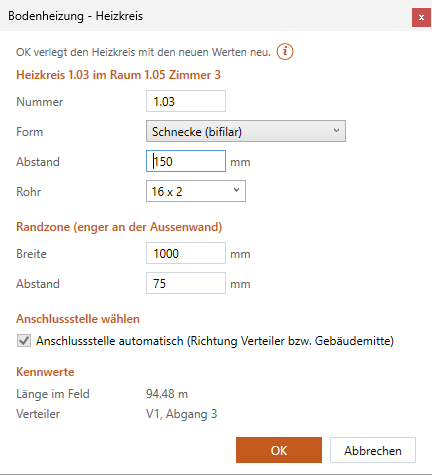
Steps
- Click Change loop ... (or Properties in the tools) and click the loop or its heated area. The area is highlighted.
- Change the values in the dialog box. Under Key figures you see the length in the area (with several loops in the area their count in parentheses) and the manifold with outlet.
- OK – the loop is rebuilt with the new values ("Loop changed – re-placed."); the leaders follow.
The values apply only to this loop; the values for the next ones are in the palette. Every field of the dialog box: Loop.
Delete loop
Goal: remove the loops of an area.
- Click Delete loop.
- Click a loop – all loops of this heated area are deleted (supply and return); the leaders are updated.
- Next one right away; Enter finishes. The heated area stays – lay a new loop with Place loop.
Loop automatic again
Goal: have loops and heated areas you adjusted by hand rebuilt automatically.
Steps
- Click Loop automatic again.
- Click a loop or a heated area – or click next to the loops and drag a window. The command line counts.
- Enter = run. Loops are re-placed in their area, areas rebuilt from the room ("2 loop(s) and 0 heated area(s) automatic again – re-placed.").
If none of them is by hand, everything stays as it is. Automatic again in the tools does the same – also for leaders, see Automatic again.
Property fields of the next loop
Goal: give every newly placed loop values for lists and annotation right away.
- On the Loops page expand the section Property fields of the next loop.
- Enter the values, for example the system. Collapsed, the section shows how many are filled in.
- Every loop you place from now on gets the values – only fields it does not yet carry. Change loops already placed in the Properties palette.
Which fields exist is set under gear menu › Property fields … (for all plug-ins).