
Rooms
Every floor heating system starts with the rooms. A room's heated areas and the loops inside are derived from it; when the room changes, they follow automatically.
Values for the next room
Goal: set the values the next room gets – before you insert it.
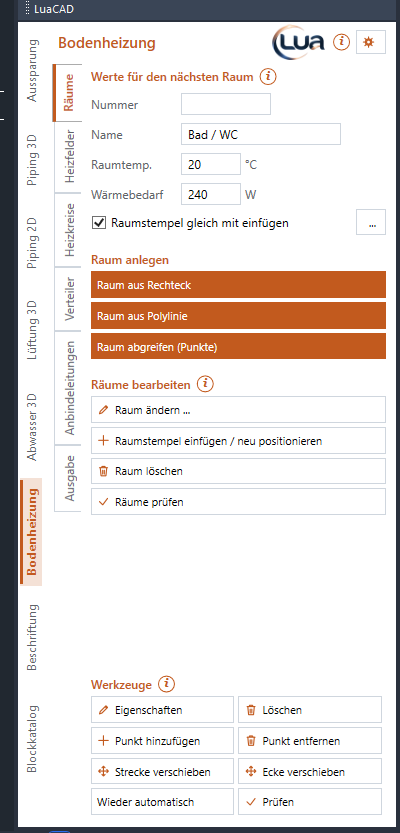
| Field | Effect |
|---|---|
| Number | The room number, for example 1.01. It applies only to the next room and is empty again afterwards – so you never assign the same number twice. Empty = the room has no number. |
| Name | The room name, for example Living (default "Room"). It stays for the following rooms. |
| Room temp. | The room temperature in °C (0 to 40, default 20) – a value for room tag, loop text and list. |
| Heat loss | Optional, in W (empty = no value) – appears, if selected, in the room tag and the loop text. The plug-in does not calculate with it. |
| Insert room tag right away | Every new room gets its room tag right away (on by default). "..." next to it chooses what the tag shows – see Room tag. |
The edge distance of the room (distance of the heated area from the wall) is set on the Heated areas page; it also applies to new rooms.
Rectangular room
Goal: insert a rectangular room with two clicks.
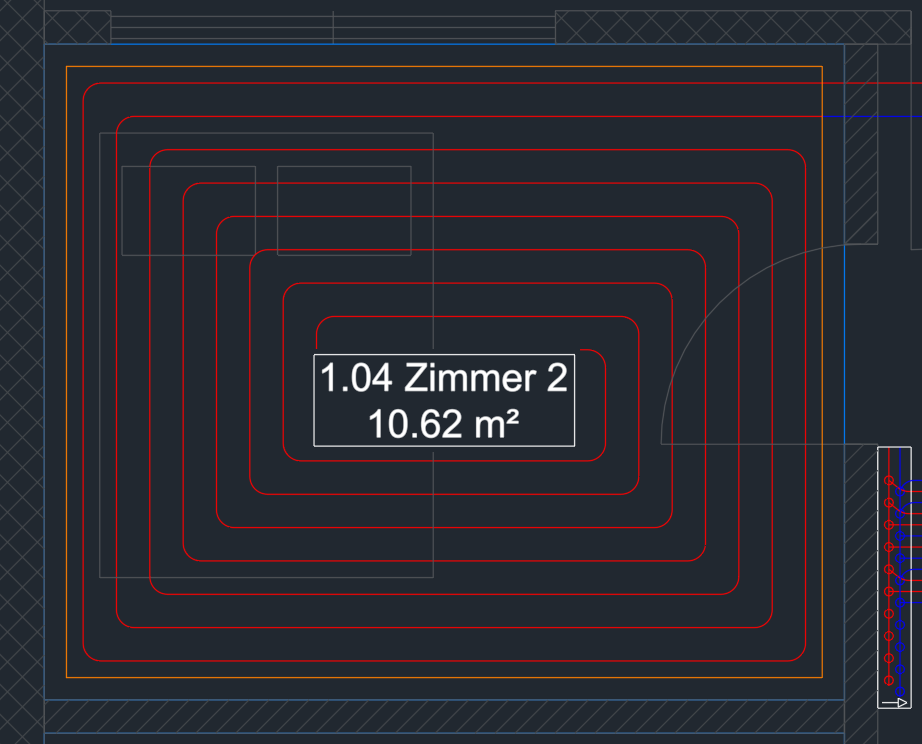
Steps
- Click Rectangular room.
- Click the first corner (1) – "1 of 2: click the first corner".
- Click the opposite corner (2). The room is created with the palette values, optionally with room tag (3); the command line shows area and perimeter.
- Next room right away; Enter or Esc finishes. Every room is its own undo step.
Room from polyline
Goal: take over a room from a closed polyline already in the drawing – for example from an architectural plan.
Steps
- Click Room from polyline.
- Click a closed polyline – on its edge or inside.
- Its outline becomes the room; the polyline itself stays. Next one right away; Enter finishes.
Pick room (points)
Goal: insert a room of any shape corner by corner.
Steps
- Click Pick room (points).
- Click the first corner, then every further one. The command line counts ("Click the next corner (4 corners) …").
- Z (Back option) removes the last corner.
- Enter or Esc closes the room – the last corner is connected to the first. A room needs at least three corners.
Change room
Goal: change number, name, room temperature, heat loss or edge distance of an existing room.
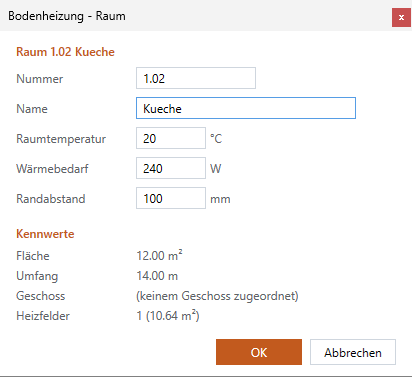
Steps
- Click Change room ... (or Properties in the tools) and click the room – on its edge or inside. It is highlighted.
- Change the values in the dialog box. Under Key figures you see area, perimeter, level (from the project) and the heated areas with their area.
- OK. If the edge distance changes and the room already has heated areas, they are rebuilt with their loops.
Every field of the dialog box: Room.
Room tag
Goal: set what the room tag of new rooms shows and how it looks.
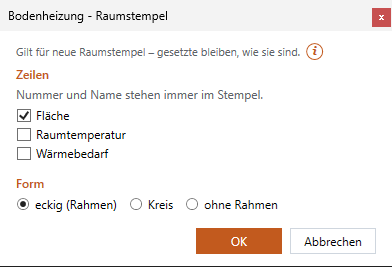
Steps
- Rooms page › "..." next to the check box "Insert room tag right away" – or gear menu › Room tag ….
- Under Lines check what appears below number and name: Area (on by default), Room temperature, Heat loss (without a value on the room the line is dropped).
- Choose the shape: rectangular (frame) (default), circle or no frame. A circle only has room for number/name and ONE line below – the first one selected.
- OK. The command line says: applies to new tags.
Insert / reposition room tags
Goal: give rooms without a tag one – and put moved tags back in their place in the room.
Steps
- Click Insert / reposition room tags.
- Click rooms – or click next to the rooms and drag a window. Rooms selected beforehand already count. The command line counts.
- Enter = run. Missing tags are added (using the template "Room (Floor Heating)"), existing ones return to their place in the middle of the room; additional text and shape stay. One undo step.
Delete room
Goal: remove a room with everything derived from it.
Steps
- Click Delete room (or Delete in the tools).
- Click the room. It is deleted with its heated areas, exclusion areas and loops; its room tag goes too.
- Next one right away; Enter finishes. One U brings the room back with everything.
Check rooms
Goal: see whether everything fits together – rooms, areas, exclusion areas, loops and leaders.
- Click Check rooms (the same as Check in the tools).
- The command line shows the counts ("3 rooms (52.4 m²), 4 heated areas (…), 1 exclusion areas, 5 loops.") and one line per issue, finally "Check: no issues." or "n issue(s)".
What "Check" reports is listed under Check.
Editing rooms with GstarCAD
Goal: change rooms with the familiar GstarCAD commands.
A room outline is a polyline. Whatever you do with it, the plug-in updates at the end of the command – in the same undo step:
| Command | What follows |
|---|---|
| Grips, STRETCH, Properties palette | The outline changes; heated areas and loops are rebuilt, leaders and room tag follow. Divisions stay. |
| MOVE, ROTATE | As above. If a whole apartment with areas, loops and manifolds moves together, nothing is rebuilt – everything comes along as it was. |
| COPY, MIRROR, paste from the clipboard | The copy gets its own ID, a free number (1.01 becomes 1.03, for example), its heated areas, loops and room tag – also in the drawing of another level. Mirrored text becomes readable again. |
| ERASE | As "Delete room". |