
Output
Bill of materials
Goal: output the quantities of the plan – pipe lengths per size and the counted fittings – as a table in the drawing or as a file.
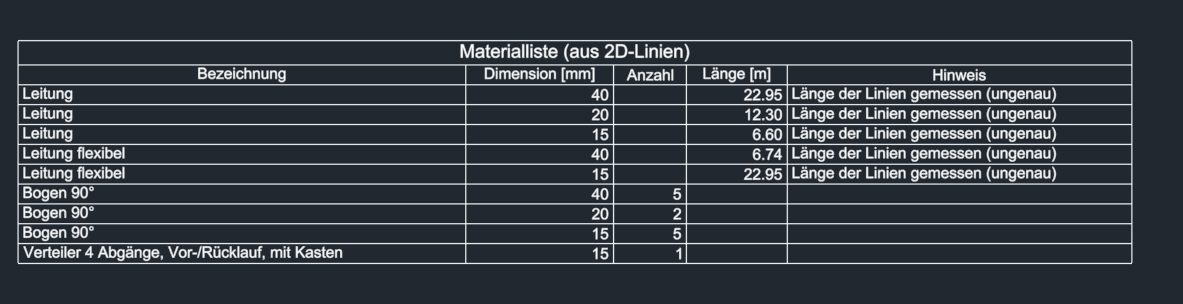
- Output page › Bill of materials.
- Depending on the list options Piping 2D asks whether the list goes into the drawing or into a file (by default every time).
- Into the drawing: the table hangs at the cursor, click the upper left corner. Into a file: CSV or Excel according to the list options.
What the list contains
| Row | Source |
|---|---|
| Pipe / Pipe flexible | Per size the length of the lines – continuous at crossings, flexible ones along the arcs. Pipes are listed with their length only, never with a piece count. The length is that of the lines and therefore approximate; the list says so at the pipe. |
| Elbow 90° (45°, 30° …) | Every corner, counted from the plan, with its angle. |
| Tee (any) / reducing tee | Every branch; reducing with the sizes, for example "60-40" or "60-50-40". |
| Reducer | Where different sizes meet. The larger size applies to the fitting, plus the reducer. |
| Elevation change | as two elbows or a tee and an elbow. |
| Riser | as "Pipe" with its riser height (if entered), insulated also "Insulation <thickness>"; an elbow at the riser top or bottom. |
| Symbol | The symbols in the pipes, counted by name. |
| Manifold | As a separate item, for example "Manifold 4 outlets, supply/return, with cabinet". |
By default the list is summarized without a system (by size and description). With the check box Per system (column System) in the list options each system has its own rows. Piping 2D has no pipe list.
With the check box Evaluate visible objects only (Output page, off by default) pipes on layers that are turned off or frozen are not counted.
List options
Goal: set where the bill of materials goes and what it looks like.
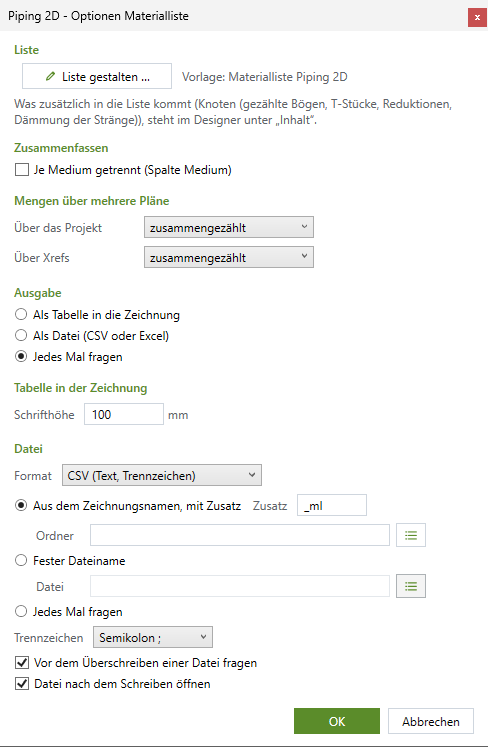
"…" next to Bill of materials opens the options:
| Area | Setting |
|---|---|
| List | Design list … opens the list layout dialog box (columns, sort order, totals, filter, Excel template – with preview); next to it the template. Summarize: per system. |
| Quantities across plans | Across the project or across xrefs: quantities combined, per plan or per level. |
| Output | As a table in the drawing · As a file (CSV or Excel) · Ask every time. |
| Table in the drawing | Text height in the units of the drawing. |
| File | Format (CSV or Excel workbook), file name (from the drawing name with suffix and folder · fixed file name · ask every time), delimiter, Ask before overwriting a file, Open file after writing. |
Every setting with its default value: Reference › Output.
Lists across several plans
Goal: output one bill of materials across several plans – the plans of the project or the xrefs of the drawing.
- Bill of materials across the project … or Bill of materials across xrefs ….
- In the dialog box check the plans (across the project by default those of your own discipline; across xrefs also nested ones, counted per insertion).
- Output as usual. The plans are only read, never opened; the list names which were read and which were missing.
Updating lists
Goal: bring inserted tables up to date with the pipes of now.
Update lists recalculates the inserted list tables with the pipes of now – the preselected ones or, without a preselection, all in the drawing. The tables stay in place and on their layer.
Annotating
Goal: annotate pipes, symbols, risers and manifolds from a template – the annotation stays attached to the object and follows it.
- Output page › Annotate. Click a pipe, a symbol, a riser or a manifold.
- At the cursor Template switches the content; "Automatic" takes the matching default template.
- Place the text.
Default templates of Piping 2D
| Template | Content | Applies to |
|---|---|---|
| System and size (2D) | system, plus the size in mm if entered | pipe, riser |
| System and system elevation (2D) | system and system elevation | pipe |
| System, size and length (2D) | system, size, below it L = length in m | pipe |
| Riser (2D) | system, size, below it the direction | riser |
| Manifold (2D) | name, below it the number of outlets and the systems | manifold |
The annotation stays attached to the pipe – also to one that is broken at crossings – and follows it when you move, copy and change it; the text recalculates (system elevation, size, length). A change to the template does not change annotations already placed.
The other buttons
| Button | Effect |
|---|---|
| Templates … | Design content, form and look of the annotations – fields such as {Medium}, {Lage}, {Dimension}, {Laenge}. |
| Multiple … | One template on many pipes: connected pipes, a selection or the whole drawing – with a filter by type, system, size and length. Each text finds a free spot by itself. |
| Edit | Click an annotation (or select it first): template, additional text, form, layer – also by double-click. |
| Check | Update all annotations and show those without a pipe. |
| Reassign | Click an annotation, then the pipe it belongs to. |
The Annotation palette offers the same functions for all plug-ins – see Annotating in Piping 3D for the template editor and the annotation styles.
On to 3D and IFC
Piping 2D itself creates no IFC. For 3D and IFC convert the plan in Piping 3D: Tools page › 2D pipes › Convert to 3D … – one elevation per system elevation, catalog and pipe spec per system; the symbols become valves, the risers vertical risers, the 2D fixtures 3D fixtures.