
Annotation styles: the look
Style of a template
Goal: give a template another look – for example larger red text for the site templates.
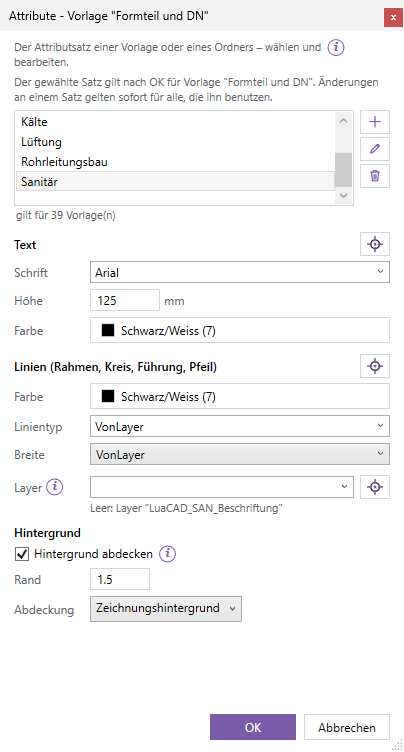
- In the palette click the pencil style at the right of the template's row (or right-click the row › Style …). Its tooltip names the style.
- In the dialog box choose a style at the top – the boxes below show its values.
- Change values: font, height, color of the text; color, linetype, lineweight of the lines; layer; background. Every change is saved in the style immediately and applies to all templates using it.
- OK gives the template the selected style (a default template becomes a template of your own with the same name). The command line says that this applies to new annotations and placed ones keep their look.
Options
- If the template's folder gives a style, its button is gray; the tooltip says that the style comes from the folder – then change the style on the folder.
- The same dialog box opens in the template editor via Appearance › Edit … – there OK only selects the style, saving happens with OK of the editor.
- Every setting: Annotation style in detail.
Style of a folder
Goal: give all templates of a folder the same look – for example all templates under Ventilation in blue.
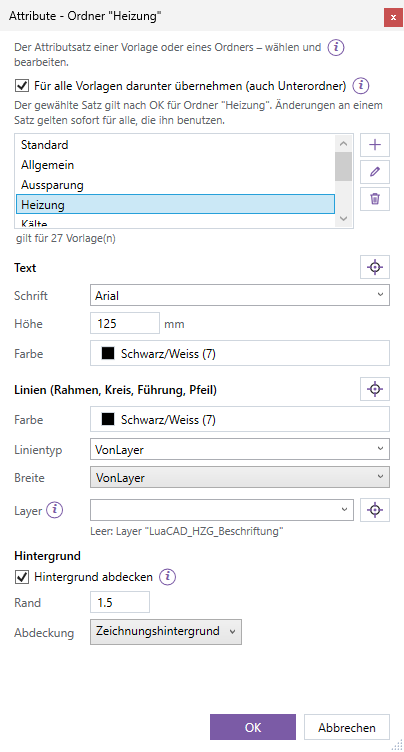
- In the palette click style at the right of the folder row.
- In the dialog box check Apply to all templates below (also subfolders).
- Choose or edit the style, OK.
With the check all templates in the folder and in its subfolders take the style of the folder; their style button is gray, the tooltip in the tree names the style. A style of its own on a template is not lost – it only rests. Without the check (cleared again) every template takes its own style again.
Setting text, lines, layer and background
Goal: define the values of an annotation style.
| Group | What | Note |
|---|---|---|
| Text | Font: a text style of the drawing or a Windows font (created as a text style), empty = the current text style | default Arial |
| Text | Height: text height in model space, in drawing units; calculating works (2.5*50 = 2.5 mm on the 1:50 plot) | default 125 mm; empty = as the plug-in, blocks and other objects 100 mm |
| Text | Color: GstarCAD color dialog box, also ByLayer and ByBlock | default 7 (black/white) |
| Lines | Color, linetype, lineweight of frame, circle, leader and arrow | linetype from the drawing or gcadiso.lin; ByLayer = not set |
| Layer | layer of the annotations; empty = the layer of the discipline (for a default style it is named below), otherwise the general annotation layer; a new name is created when inserting | list with the layers of the drawing |
| Background | Background mask (default on), border offset factor (1 = tight, 1.5 = a little more, 1 to 5), mask: drawing background color or own color | a circle always masks with the background |
Boxes and lists apply when you leave them or choose; an invalid value jumps back to the previous one. What the background mask does: Background mask.
Picking values from the drawing
Goal: take over an existing look – for example the architect's font.
- In the style dialog box click the Pick button next to Text, Lines or Layer.
- The dialog box closes; the command line asks you to click a text, an annotation or a dimension (Esc: back).
- Click the object. Text takes font, height and color (from a text, an annotation or a dimension), Lines color, linetype and lineweight, Layer the layer of any object. The command line names what was taken over.
- The dialog box opens again with the same state.
A wrong click is explained and repeated; Esc returns without a change.
Copying and pasting styles
Goal: transfer the look of one template to another without typing values.
- In the palette click the row whose style you want to take over, Ctrl+C (or right-click › Copy style). The status line confirms how many values were copied.
- Click the target row (template or folder), Ctrl+V (or right-click › Paste style).
- All values of the effective style are always copied; what the target knows is pasted. If a style with exactly these values exists, the target takes it, otherwise a new one with the name of the target is created.
A template whose style comes from its folder accepts nothing ("Paste style" is gray). Without copied values the status line says that there is nothing to paste. Pasted styles apply to new annotations.
Creating, renaming, deleting styles
Goal: maintain styles of your own.
- In the style dialog box at the right of the list: + = new style as a copy of the selected one ("Style", "Style 2" …); rename it right away.
- Pencil (or double-click the style) = rename: type the name, Enter applies, Esc cancels. A name already in use is refused.
- Trash can = delete after confirmation; the templates using it take "Standard" afterwards.
"Standard" and the default styles of the disciplines cannot be renamed; "Standard" and an unchanged default style cannot be deleted. If you delete your changed version of a default style, the default version comes back. Below the list you see how many templates use the style.