
Templates
Choosing a template
Goal: decide which template Annotate and Multiple use.
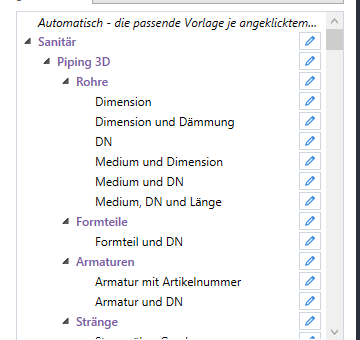
- In the palette expand the folders of the tree: discipline › plug-in › part type – for example Ventilation › Ducts.
- Click the template. Below the tree you see its content (lines separated by "|"), what it applies to ("applies to: Ventilation: Duct") and – if it is not the default style of the discipline – its annotation style. The status line names the choice.
- Annotate now uses this template. A double-click on the template starts Annotate right away.
Options
- A click on a folder selects no template – the previous choice stays; below the tree you see whether the folder gives an annotation style.
- Automatic (at the top) clears the choice: then every part takes its matching template.
- The choice is remembered, also across a restart. Folders you collapse stay collapsed.
- The tooltip of a template shows its description.
Searching and filtering
Goal: quickly find the right one among many templates.
- Type part of the name into the search box above the tree – for example "slope". It searches name, content, description and folder; case does not matter. While searching all folders are open.
- Below it choose a part type under applies to – for example "Duct". The tree only shows templates that apply to this part type (and those that apply to everything). "Other objects (lines, blocks …)" shows the templates for objects that are not from LuaCAD.
- Clearing the search box or choosing "all part types" shows everything again.
The "applies to" choice is remembered. If no template matches, the tree is empty except for "Automatic".
Automatic
Goal: give every part its usual annotation without thinking about it.
- Click Automatic in the tree (at the top, in italics).
- Annotate and click a part – LuaCAD takes the first matching template:
- first the templates of the part's plug-in, then the general ones, then the rest;
- for Piping the copy of the discipline of the system (a pipe with a heating system gets the template under Heating and with it the heating layer);
- among the default templates the first choice of the part type: on a pipe "System and size", on a fitting "Fitting and nominal size", on a valve "Valve and nominal size", on a duct "Duct dimensions", on a drain line "Nominal size and slope";
- if you took another template on a part of the same plug-in in this session, that one comes first.
- In step 2 at the cursor the Template option switches to another matching one.
The template editor
Goal: look at a template, change it or create a new one.
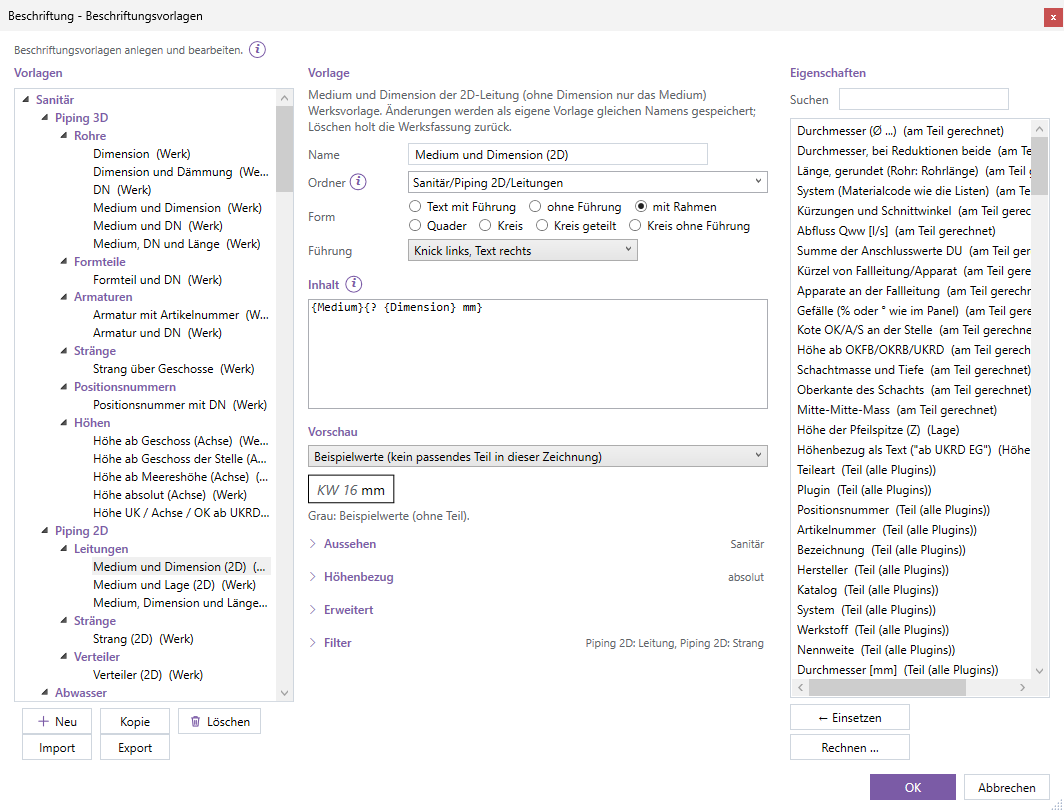
- In the palette select the template you want to change (or any one in the folder where a new one should go).
- Click Edit / add template (or gear › Design templates …). The editor opens on this template.
- In the middle at the top change name, folder, form, leader and the content; the preview shows the result at once on a part of the drawing (list above it) or with sample values.
- Below, expand the collapsed sections as needed: Appearance (annotation style), Elevation reference, Advanced, Filter. Collapsed, the header names the state ("Standard", "absolute", "applies everywhere" …).
- OK saves all changes of all templates; the command line says that they apply to new annotations. Cancel discards everything.
Options
- A default template is marked "(default)" in the tree; if you change it, it becomes a template of your own with the same name when saving ("(default, changed)"). Its name cannot be changed. Delete brings back the default version.
- The sections you expand stay open for the session.
- Opened from the Annotation palette the editor shows the templates of all plug-ins; opened from a plug-in only those of the plug-in and the general ones (check box "show all plug-ins").
Every field of the editor: Template editor in detail.
Creating a new template
Goal: a template of your own, for example "Pipe with room" for the site management.
- In the editor at the bottom left New – this creates "New annotation" with the content
{Bezeichnung}, form with frame, applies to everything, in the selected folder (otherwise under Custom). Or Copy: a copy of the selected template ("… copy") in the same folder. - Give it a name – it must be unique.
- Choose the folder or type a new path with "/" between the parts (for example "Plumbing/Site"); Enter or leaving the field applies it, the tree shows the template there.
- Set content, form, filter etc., OK.
Delete asks for confirmation for a template of your own (annotations using it keep their content); an unchanged default template cannot be deleted.
Content with fields
Goal: decide which text goes onto the part.
- Write into the content box. Every line becomes a line of the annotation.
- Insert a field: search the properties at the right (name or key), double-click or ← Insert – the field goes to the cursor position. At the top of the list are the values the plug-in calculates on the part ("calculated on the part": slope, spot elevation …), the elevation of the arrowhead and the elevation reference as text.
- Append a format:
{Laenge:m:2}= meters with 2 decimals,{Daemmdicke:mm:0}= mm without decimals. - Put optional parts into
{? …}:{? ({Daemmdicke:mm:0})}only appears with insulation. - Check the preview: choose a matching part of the drawing above it. Sample values are shown gray and in italics – for fields the part does not provide or that only exist in the drawing (slope, spot elevation); below is the note which ones.
Options
{Hersteller|-}: replacement text when the field is empty.- A line whose fields are all empty is dropped; if the whole template gives no text, the part does not get it.
- A template without any field becomes free text.
- All notations: Fields.
Calculate
Goal: have a value calculated, for example the length in meters or the height of a part.
- In the editor click the position in the content, then Calculate … at the right.
- In the dialog box build the expression from the properties and choose the format; the trial shows the value on the selected sample part.
- OK – the field goes to the cursor position as
{=expression:format}, for example{=Laenge/1000:0.00},{=HoeheOK-HoeheUK}or{=Gewicht*Anzahl}.
Form and leader
Goal: show the annotation in a frame, in a circle or as text only.

- In the editor choose under Form: text with leader · no leader · with frame · box · circle · divided circle · circle, no leader.
- For a form with a visible leader choose under Leader: landing at left, text at right or single vertical line, centered. With "no leader", "box" and "circle, no leader" the choice is gray.
- The preview shows frame or circle.
What each form means: Forms and Leader. A single placed annotation gets another form in Edit annotation.
Elevation reference of a template
Goal: decide what the elevations of a template are measured from.
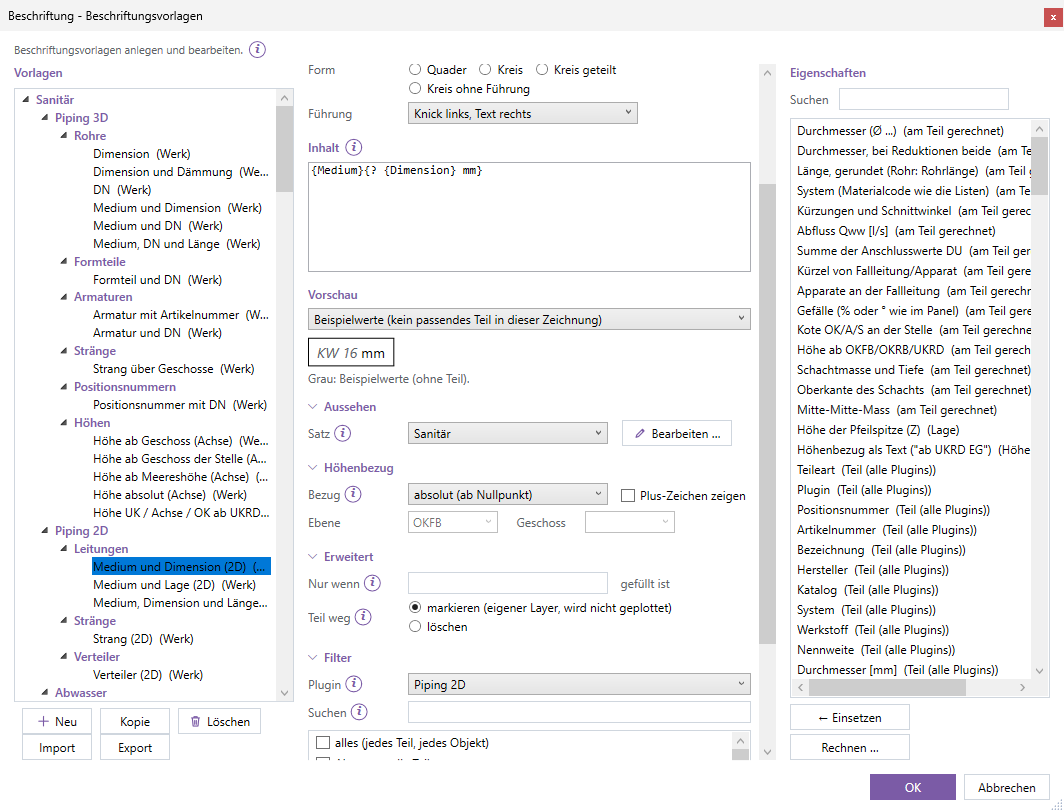
- In the editor expand Elevation reference.
- Choose the reference: absolute (from project zero) · from home level · from level (empty = level of the drawing) · above sea level.
- For a level reference choose the reference level (TOS, FF, FC, BOS or one of the project's own); for a fixed level the level (abbreviation; empty = the level of the drawing).
- For "above sea level" enter the sea level elevation of ±0 (in m for a mm drawing) – the template shows Z plus this value, followed by "a.s.l.".
- Show plus sign: values above the reference level with "+".
The reference applies to the elevation fields {HoeheUK}, {HoeheAchse}, {HoeheOK}, {HoeheSohle} and {Punkt.Z}; {HoeheBezug} writes it as text. In the preview the elevation is taken at the middle of the part, in the drawing at the arrowhead. The supplied elevation templates exist four times per discipline (absolute, from level, from home level, above sea level) – see Elevations and spot elevations.
Only if and Part removed
Goal: allow an annotation only on certain parts and decide what happens to it when its part is deleted.
- In the editor expand Advanced.
- Only if … is filled: required fields, separated by commas (for example
Position). If one of them is empty on the part, it does not get this annotation – not with Multiple either. Empty = always. - Part removed: mark (own layer, not plotted) – the annotation goes on the layer "Orphaned annotation", Check shows it, Reassign attaches it again – or delete: it goes along with the part (for example the room tag of the floor heating).
Filter: what the template applies to
Goal: offer a template only for the parts it fits.
- In the editor expand Filter.
- Plug-in: under which plug-in the template appears in that plug-in's lists (Annotate and Multiple of a plug-in show by default only its templates and the general ones).
- Check in the list what it applies to: everything, per plug-in all parts or single part types ("Piping: Pipe", "Ventilation: Duct" …), other objects by object type (LINE, LWPOLYLINE, INSERT, 3DSOLID …). Narrow the list with search.
- Nothing checked = applies everywhere.
The part types of the list come from all templates and from the parts of the drawing – a part type the drawing does not have yet only appears once such a part exists or a template names it.
Sharing templates: import and export
Goal: bring your own templates to another computer or to the whole office.
- In the editor select the template, Export – save a template file.
- On the other computer Import in the editor, choose the file. If the name already exists, the new one gets a number added.
- OK saves.
All settings including templates also go along with LuaCAD settings › "Export settings …" – see Transferring settings.