
Manifolds and PEX pipes
Values of the next manifold
Goal: set what the next manifold looks like – before you insert it.
At the top of the Manifold page under Next manifold:
| Row | Effect |
|---|---|
| Template | A stored template brings all values – name, systems, outlets per system, outlet spacing, cabinet, outlet side. "(no template)" = the values below. You create templates in the manifold dialog box. |
| 1st system, Outlets | The system of the first row and right below it the number of its outlets (1 to 24). |
| 2nd system, Outlets | The system of the second row and its outlets – "no system" = a manifold with one system only (the second outlets row disappears). The two rows may have different numbers of outlets, for example 3 × cold water and 2 × hot water. |
| With cabinet | The manifold cabinet as an outline; without: only bar and outlets. |
If the values differ from the selected template, the note below says so ("The outlets differ from the template"). The systems offered are the systems of Piping 2D; which of them is cold water, hot water or cold water mains pressure is set by the Manifold options.
Inserting a manifold
Goal: place a manifold at the wall – with every outlet as a connector.
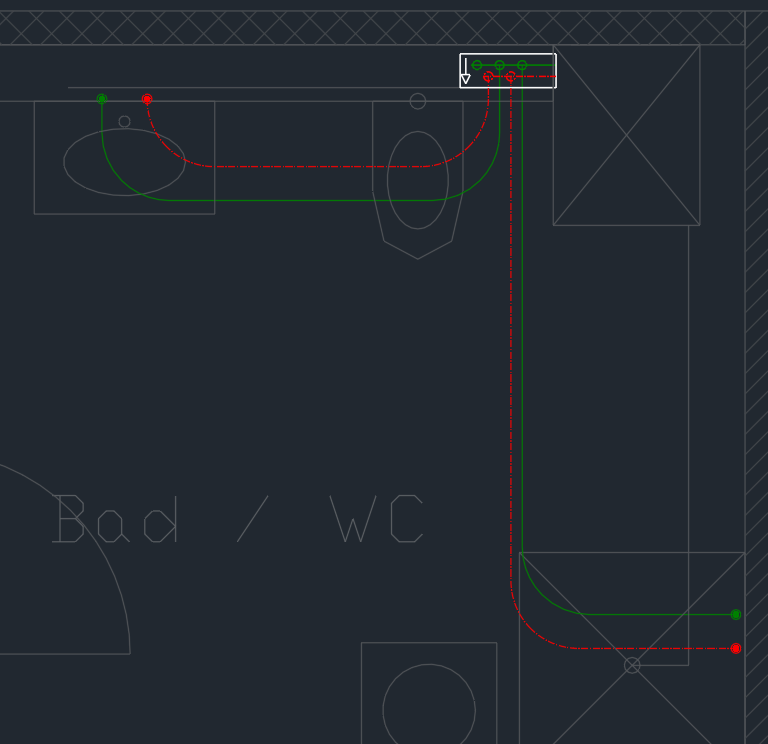
- Click Insert manifold …. With the check box Show the manifold dialog box before inserting (on by default) the manifold dialog box comes first with name, systems, outlets, outlet spacing, cabinet, outlet side and the templates; otherwise the manifold hangs at the cursor right away with the values of the palette.
- With the check box Show properties before inserting (off by default) the property fields dialog box comes next.
- Click the insertion point (1) – usually the wall behind the manifold (base point "center back (wall)").
- The next manifold hangs at the cursor with the next name ("V1" becomes "V2"). Enter = finish. With the dialog box shown first, Esc returns to the dialog box.
Keys at the cursor
| Key | Effect |
|---|---|
| R | rotate |
| D | type the angle |
| W | pick the angle at a wall (two clicks) |
| M | mirror in turn: top/bottom (side of the outlets), left/right |
| S | outlet side: outlets at the front (into the room) or at the back (through the back wall) – the arrow in the cabinet shows it |
| Space | switch the base point: center back, left back corner, right back corner, center front |
| A | distance to a reference point |
Every outlet and the supply inlet act as connectors: a pipe of the same system starts or ends there, parallel pipes start there as at risers.
Changing, flipping and deleting a manifold
Goal: adapt an inserted manifold – including the number of its outlets.
| Button | What happens |
|---|---|
| Change manifold … | Click a manifold – the manifold dialog box with its values: name, systems, outlets (also afterwards), outlet spacing, cabinet. Position and name stay unless you change them. The PEX pipes follow their (moved) outlets. |
| Flip outlet side | Click a manifold – the pipes then leave it on the other side (into the room at the front or through the wall at the back); the arrow in the cabinet turns. |
| Delete manifold | Click a manifold – it is deleted. The PEX pipes at it stay; their outlet points to nothing, "Check" names them. One U brings the manifold back. |
Properties and Delete in the tools also take a manifold you click. If outlets no longer exist after the change while a PEX pipe was attached to them, a note says so – reconnect the pipe there or delete it.
Move a manifold with the GstarCAD MOVE, ROTATE or MIRROR commands: the PEX pipes at it follow.
Connecting a manifold
Goal: connect all selected 2D fixtures to a manifold at once with flexible PEX pipes – in order and with as few crossings as possible.
- Manifold page › Connect manifold …. Before the first click the insertion help shows the procedure.
- Click the manifold.
- Select the fixtures: click them or click next to them and drag a selection window; Enter = selection done.
- Piping 2D assigns each connector the next free outlet of its system – cold and hot water of one fixture get the same outlet in both rows – and shows the overall solutions in color. Tab switches; the solution "ordered" spreads the cross pieces apart by the outlet spacing and avoids crossings and overlaps.
- A click or Enter accepts all pipes in one step, Esc discards.
The pipes are flexible with the radius of the palette (at least 200 mm), lie on the system elevation of the palette, carry the system of the connector and the size of the outlet. Each pipe remembers its outlet (bill of materials: column "Outlet") – an occupied outlet is not assigned again, even if the manifold is moved later. The routes avoid the outlines of other 2D fixtures and manifolds.
Connecting connectors
Goal: connect a single outlet flexibly to a single connector of a 2D fixture.
- Manifold page › Connect connectors.
- Click the outlet at the manifold (1) – or a connector of a 2D fixture.
- Click the connector at the fixture (2). Piping 2D checks system and occupied outlets – only the same system is connected, an occupied outlet is not assigned again.
- The routes appear in color (3). Tab or right/left arrow switches, a digit selects directly; a click or Enter accepts, Esc discards.
- Then the next pair right away; Enter = finish.
Manifold options
Goal: set which system has which role at the manifold and what the cabinet looks like.
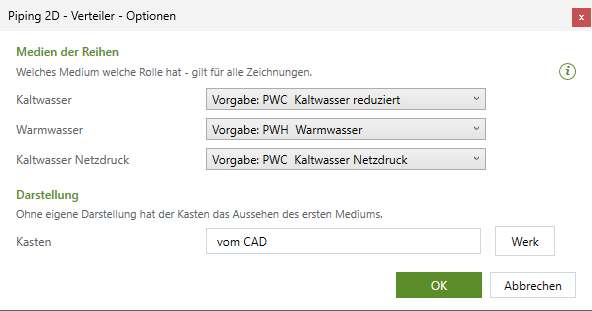
- Gear menu › Manifold options ….
- Systems of the rows: per role (cold water, hot water, cold water mains pressure) the system from the list of Piping 2D. "Default" = the system LuaCAD finds by abbreviation and description – for cold water the reduced cold water, not mains pressure.
- Display › Cabinet: layer, color, linetype and lineweight of the cabinet; Default restores the default display – then the cabinet looks like the first system.
- OK – applies to all drawings and the next manifolds.