
Example 1 – Supply air for a room
From an empty floor plan to a finished supply air duct in 3D: apartment A2 on the first upper floor of the sample project, the ventilation drawing of level OG1. The main duct runs along the wall in the corridor, a branch leads through the apartment door and the entrance hall into room 2; there a grille blows the air downward. Each step has one sentence, one picture and the clicks – the light blue numbers in the text are the numbers in the picture above. Variants and details are collapsed under "More".
1. Open the palette and choose values
What is set at the top of the Ducts page applies to every duct you insert afterwards.
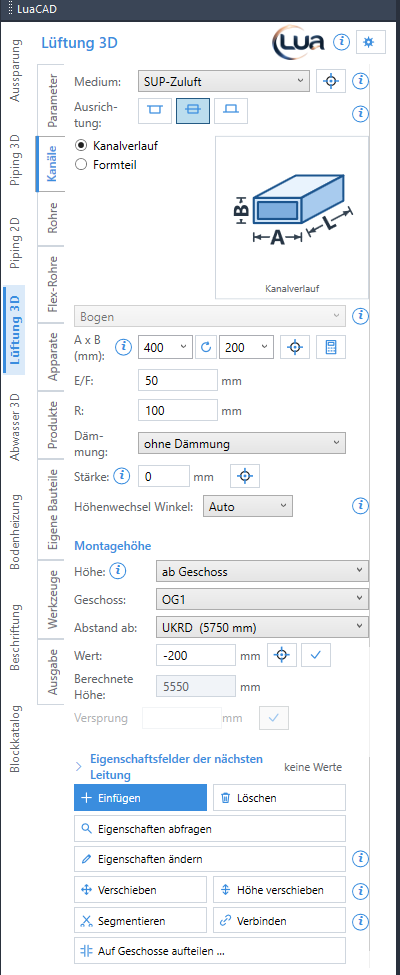
Ribbon › LuaCAD tab › Ventilation 3D, on the palette the Ducts page.
- 1 System "SUP-Zuluft" (supply air) – it sets color and layer.
- 2 Justification center: the elevation refers to the centerline of the duct.
- 3 Duct run – LuaCAD draws a whole run and places elbows, tees and reducers itself.
- 4 A × B 400 × 200 (A = width, B = height).
- 5 Elevation "from level", level OG1, distance from BOS, value −200 and Enter: the centerline lies 200 mm below the slab, the top 100 mm below it. Calculated elevation below shows 5550 mm.
- 6 You need Insert in step 2.
More details
- Palette values only apply to parts you insert from now on – change what is already drawn with Change properties.
- Where ducts and fittings come from is set on the Parameters page; by default "EN 1505 / EN 1506 (made to measure)" – see Catalog, material and classes.
- With justification top the elevation refers to the top – handy when all ducts hang flush below the slab. A branch, however, always sits centered on its main duct; with justification center the elevation fits both. See Justification and elevation.
- The button next to A × B calculates the size from the airflow – see Duct sizer.
2. Draw the main duct in the corridor
The main duct comes from the riser zone on the right and runs 100 mm in front of the corridor wall to the left, on to the next apartment.
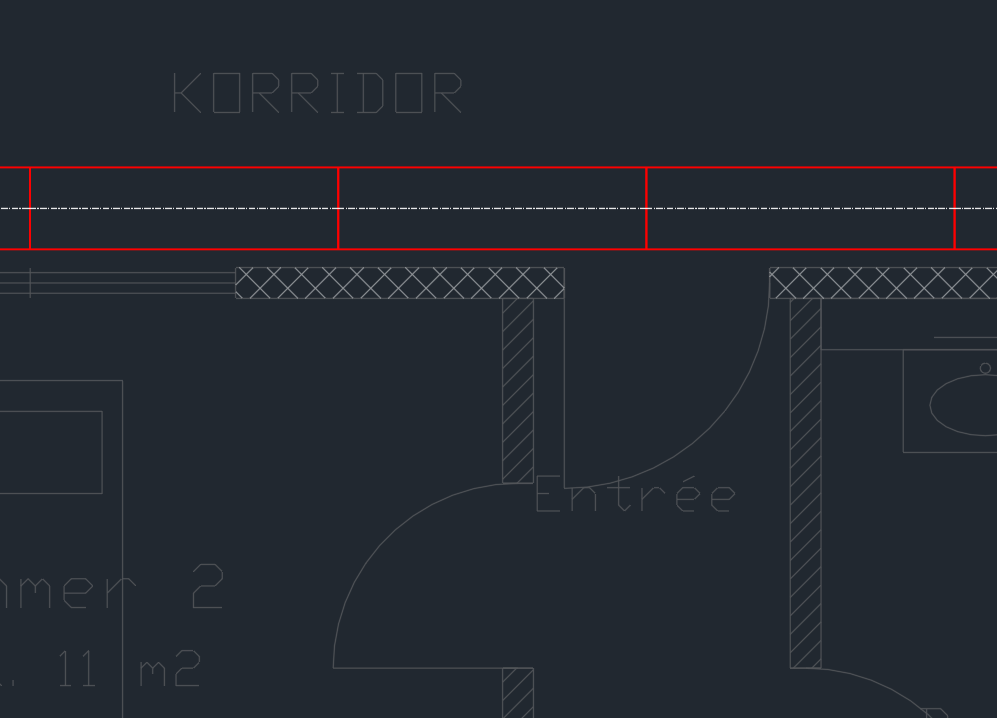
Insert (Ducts page), then:
- Click the start on the right in the corridor.
- Press A – the Change elevation dialog box opens (picture below). Under Wall offset choose the side "left" and the distance 100, OK.
- Click the next point on the corridor wall on the left: 1 the duct lies 100 mm in front of the wall. Enter ends the run.
- 2 LuaCAD divides long straight runs into ducts of the maximum length of the catalog (here 1.5 m).
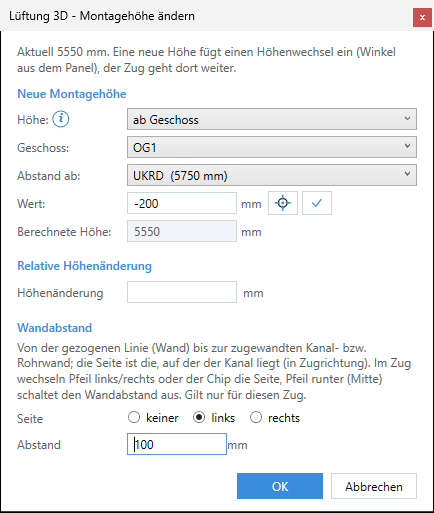
- 1 The elevation the run is on right now.
- 2 A new elevation applies from the next point – here it stays.
- 3 Leave empty – otherwise the duct changes its elevation by that much.
- 4 Side "left" (in the drawing direction) and distance 100: the clicked points are the wall, the duct lies 100 mm next to it. The wall offset only applies to this run.
More details
- The Space switches between "snap to angle" (angle increment of the Parameters page) and free; a typed number is the length of the next piece.
- Instead of a wall offset you can draw along a duct side: ← or → at the cursor – see Drawing along a duct side.
- After Enter or Esc the run is finished, the placed parts stay; you can start the next duct right away. A second Esc ends the command.
- All keys: Inserting a duct, Elevation and wall offset while drawing.
3. Draw the branch into the room
The branch 200 × 150 starts on the main duct in front of the apartment door, runs through the door into the entrance hall and through the room door into room 2.
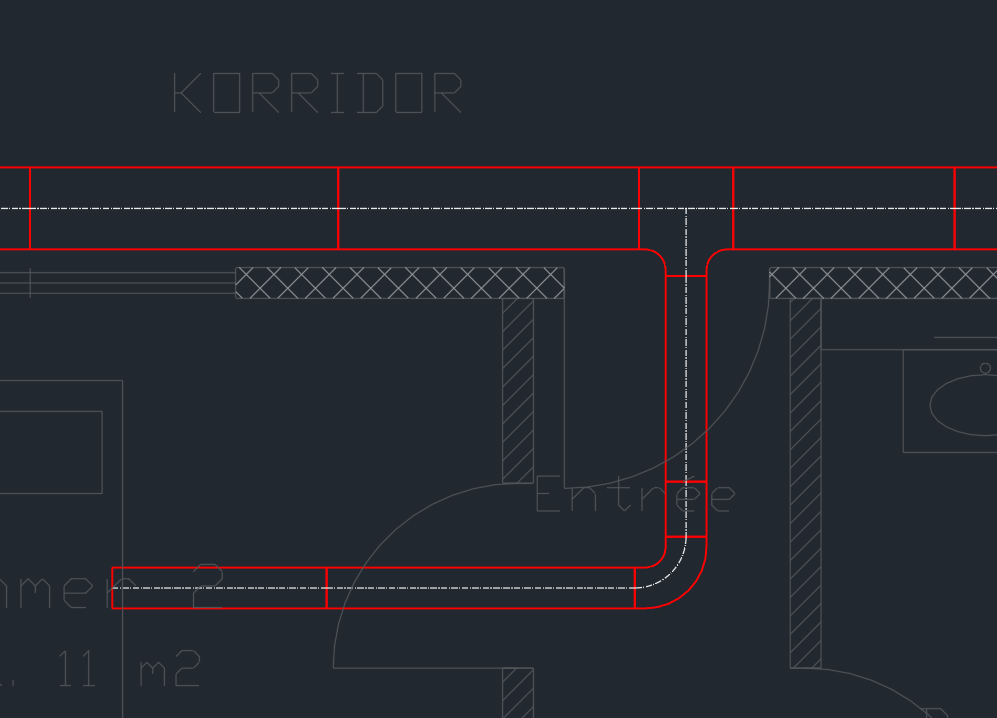
On the palette set A × B to 200 × 150, Insert, then:
- Click the start on the main duct in front of the apartment door and drag away from the duct into the door – the tee branches off to the side of the cursor.
- Click in the entrance hall in front of the room door: 1 LuaCAD inserts the tee into the main duct and divides it, 2 a reducer sits between the outlet of the tee and the smaller duct.
- Click in room 2: 3 the elbow is created at the corner, 4 the duct ends in the room. Enter.
More details
- If a run starts on a duct, the branch sits centered on its centerline. If the elevation on the palette is higher or lower, the tee branches upward or downward; if the height is not enough for that, the command line says so – then change the elevation (A) or choose "free" on the palette.
- Where a duct has to go through a wall instead of a door, an opening belongs there – see Opening.
- More under Inserting a duct and Inserting a fitting.
4. Place the grille and close the end
A supply air grille on the bottom of the duct blows the air into the room; the open end gets an end cap.
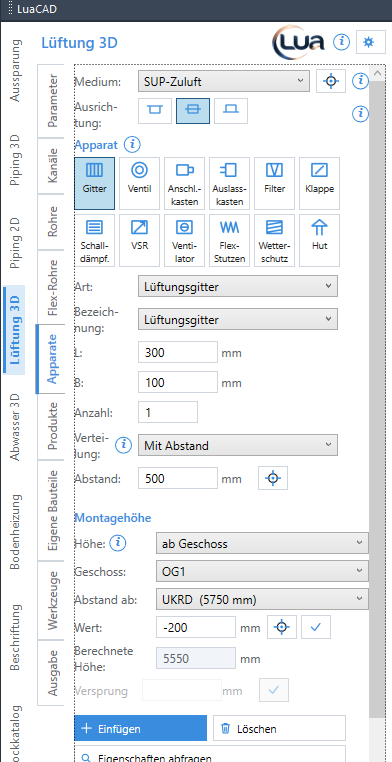
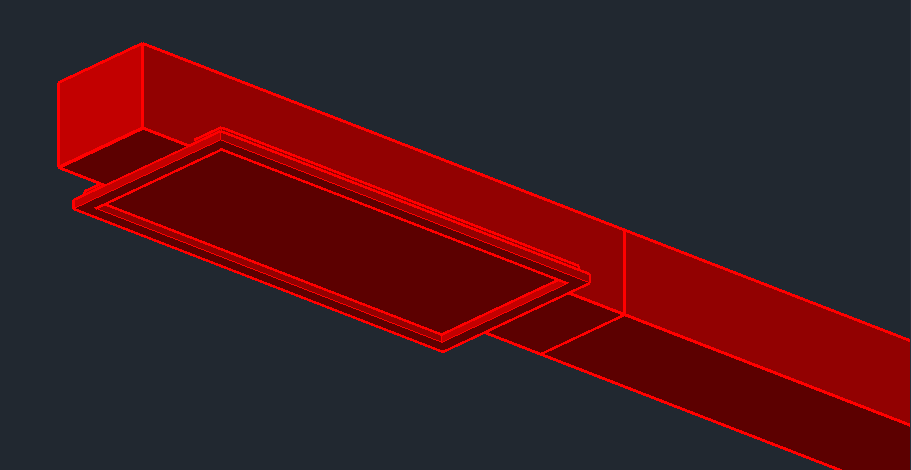
- 1 Duct accessories page: choose Grille, 2 L 300 and B 100.
- 3 Insert, click the duct in the room (1 of 2), choose the side bottom with R, slide the grille along and click (2 of 2). The duct runs through below the grille, LuaCAD cuts the opening itself.
- Ducts page › Fitting, in the list End cap, Insert and move it to the open end in the room – the cap connects, a click places it (2 in the right picture).
More details
- In a view from below the grille goes straight onto the bottom.
- A grille slid past the open end sits on the face – LuaCAD then adds a cap by itself.
- More under Placing a grille, air valve or takeoff and Setting up a duct accessory.
5. The result in 3D
The ducts are solids in the drawing – with the fittings LuaCAD placed along the way.
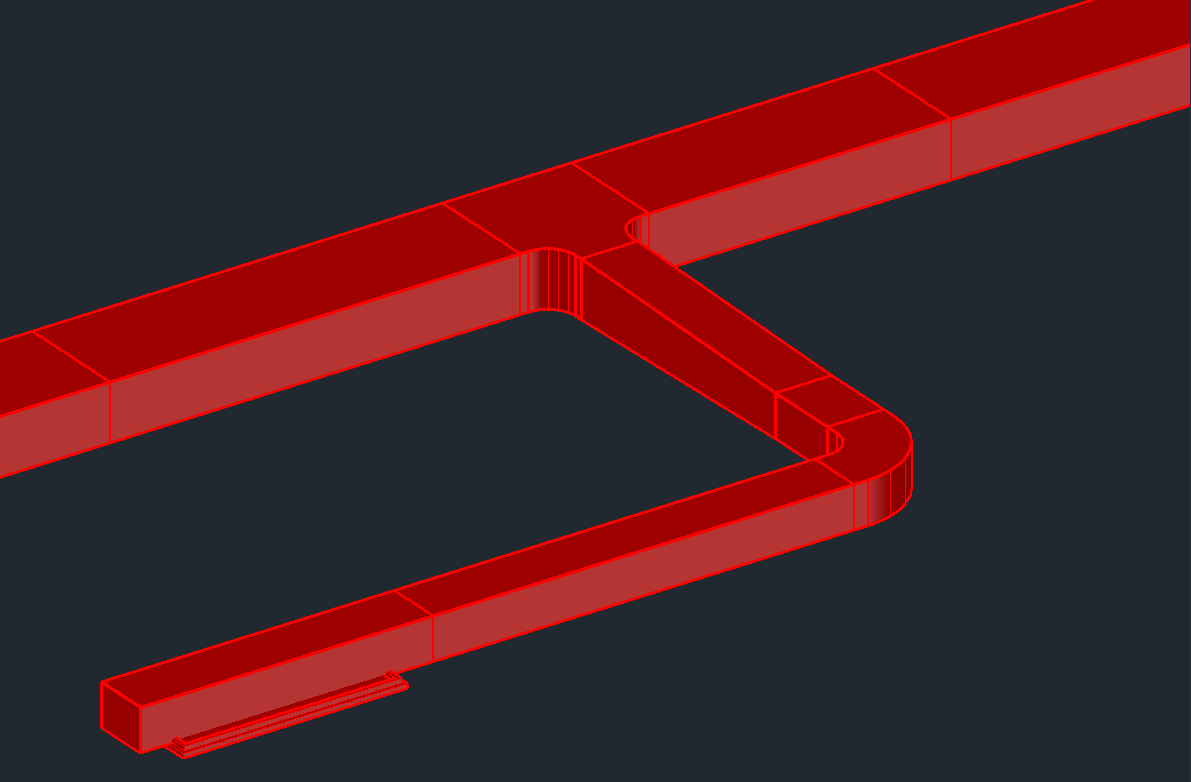
- Set the view to an isometric, for example with the ViewCube at the top right of the drawing.
- 1 … 6 Every part carries system, size, catalog and material; LuaCAD numbers the parts of the network by itself (item numbers 1.1, 1.2 …).
More details
- The GstarCAD moves for 3D (orbit the view, visual styles) are under CAD basics.
- Click a part with Query properties to see all its values – see Query properties.
6. Annotate and output the list
System and size on every duct – once per run is enough.
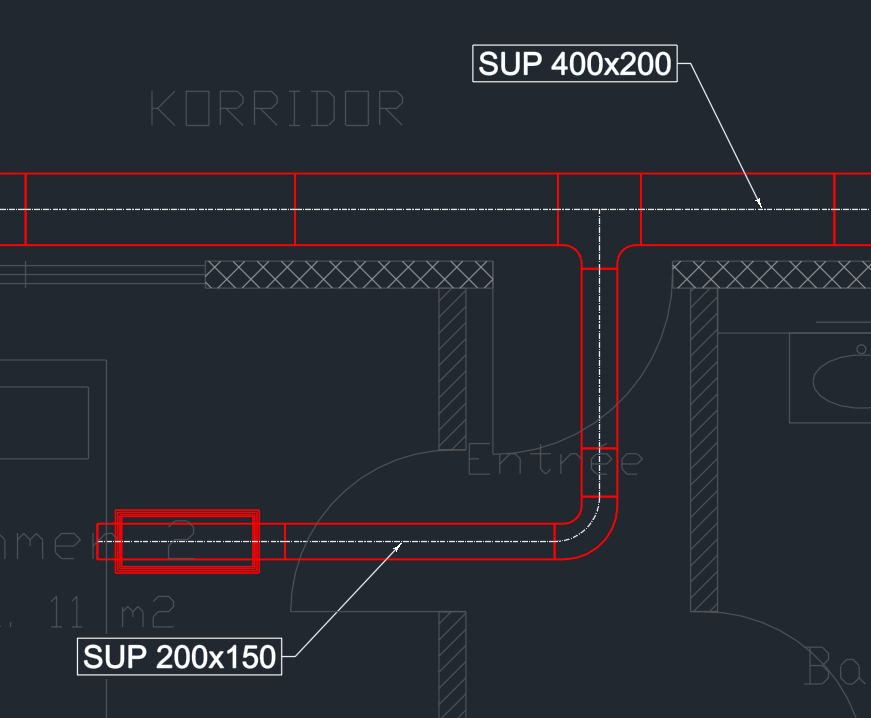
Output page › Annotate:
- 1 Choose the factory template for system and duct size, click the main duct and place the text in the corridor.
- 2 The same for the branch – place the text in the room so the leaders do not cross.
- Bill of materials (Output page): the table hangs at the cursor, click next to the floor plan. Ducts and fittings are listed as prefabricated parts with count, area and weight, the grille with its count.
More details
- The annotation sticks to the duct: move it and the text moves along. A changed template does not change placed annotations.
- More under Annotate, Bill of materials and Parts list.
7. Changing it afterwards
You change it like a CAD object – the neighbors adapt.
In the video: Editing with grips, Query properties and Delete.
Change it with a grip
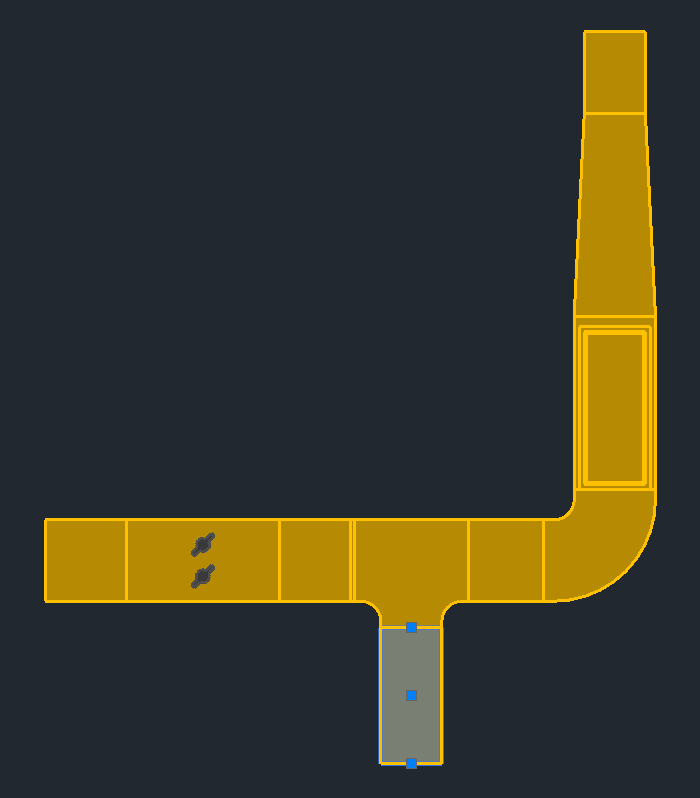
- Click the duct – 1 2 3 grips appear at the start, middle and end of the straight run (duct section); an elbow or tee has a grip at its node.
- An open end makes the section longer or shorter, the middle moves it like "Move", the node moves the corner. The neighbors adapt at the end of the command. More under Editing with grips.
Move
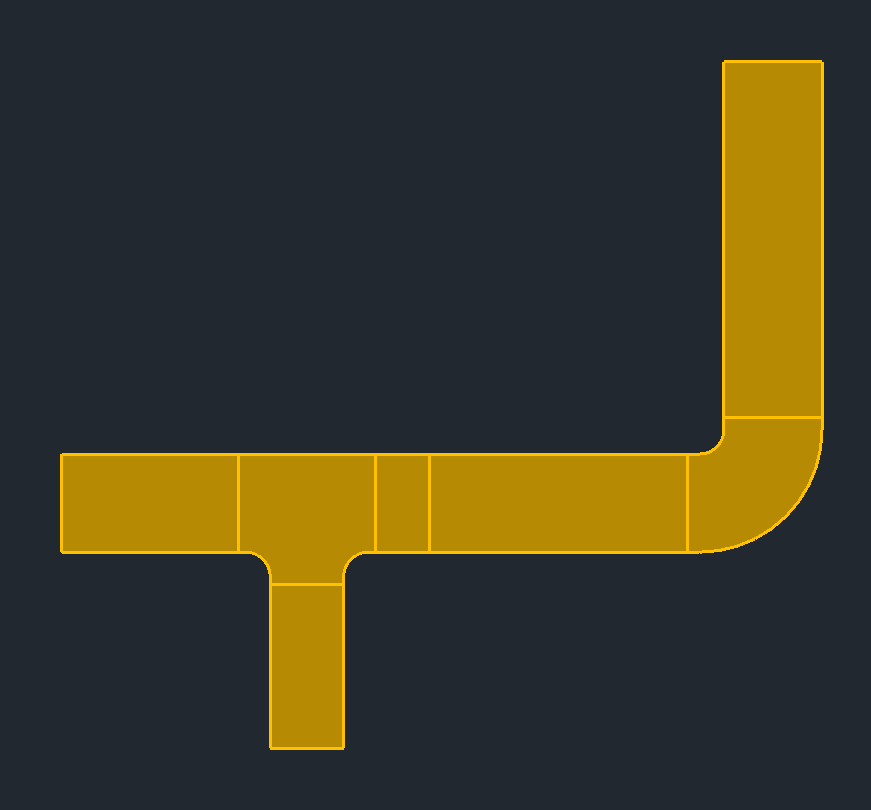
- Move (Ducts page) and click the duct section 1; Enter.
- Click the new position – or press A and type a distance, for example 500. Q locks the movement across the section, L along it.
- 2 Adjacent straight ducts become longer or shorter; where that is not possible without an offset, an offset fitting is created. More under Move.
Move elevation
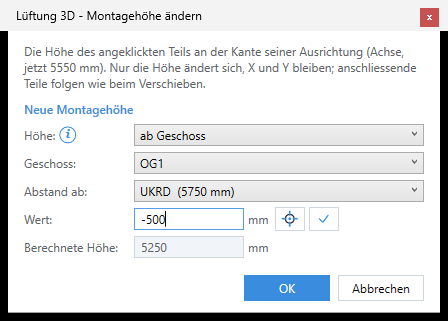
- Move elevation (Ducts page), select the main duct, Enter.
- Press A: 1 the dialog box names the current elevation, 2 3 from level OG1, BOS, 4 value −500 – the centerline then lies 300 mm lower (calculated elevation 5250 mm). OK.
- Up to the duct height the neighbors get an offset fitting, above that offset elbows. More under Move elevation.
Continue with example 2
The video shows example 1 once more as a whole; then continue with these pages.
- Example 2 – A supply air network in the corridor: duct sizer, tee and reducer by hand, damper inserted in-line, flexible duct to the plenum box, Move elevation, Connect.
Other ways
- A round duct or a flexible duct to the outlet: Inserting a round duct, Inserting a flexible duct.
- A damper or a sound attenuator in the duct: Inserting a part in-line.
- Esc cancels every function; another button on the palette cancels the running command and starts the new one. U undoes the last step.